
One of the most important steps besides watering your orchid is the level of humidity inside your house. Dryness is always an issue with orchids, and humans as well. Itchy, cracked skin, splintering fingernails, static and frizzy hair, high susceptibility to fungal and bacterial infections, and skin irritations all come from not enough water moisture (or vapor) in the air.
On the other hand, too much humidity can cause mold growth and respiratory problems. In their own way, orchids have similar issues which we’ll discuss below.
What is the best humidity for orchids? Most orchids grow in an environment where the relative humidity ranges from 50 to 70%.
Yet, it’s common to group orchids together and take general results as an answer. The ideal humidity for each orchid will be different. Relative humidity percentages for the most common orchids are as varied as their growth habitats, as you can see below.
Humidity Requirements for Orchids
Phalaenopsis – 50%.
Cattleyas – 50 to 80%
Dendrobiums – 50 to 80% (hard cane dendrobiums)
Oncidium – 30 to 60%
Miltonia – 50-65%
Miltoniopsis – 50-70%
Lepanthe – 80%
Phynchostylis Gigantea (Fox tail) – 70-85%
Brassavola – 40-70%
Bulbophylum 70-90%
Epidendrum – 50-80%
Laelia – 50%
Masdevalia 60-80%
Maxillaria – 40- 70%
Paphiopedilum – 40 -50%
Phragmapedilum 50-70%
Vanda – 80%
Zygopetalum 40-60%
Most orchids thrive in a tropical rain forest, where humidity levels oscillate from 50 to 70% during the day, yet each species can have different growing conditions and require special humidity levels. To know how to properly provide the required humidity for your orchid, you’ll need to research it’s genus name and species.
One thing is certain: our home environments are probably all too low for orchid growth. To properly raise these levels of humidity there are several things you can do:
–install a humidifier in one specific room
-acquire a humidistat or an inexpensive humidity gauge to verify percentage
-spritz with a misting nozzle or a spray bottle
-use a tray with water
-plant your orchids with more sphagnum moss
-invest in low humidity orchids as opposed to high humidity ones
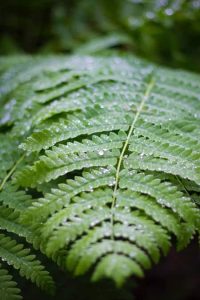
-add other houseplants to each room, like bushy ferns
Proper humidity can make you feel cooler in the summer and warmer in the winter. From a strictly building perspective, an ideal indoor environment is anywhere above 30% humidity during all seasons, but the most comfortable is from 45 to 55%. Both contractors and heating/cooling vendors recommend that the levels don’t range over 55%. These levels, on the other hand, are not enough for most orchids, which thrive at 50-70%.
According to the article Growing Orchids as Houseplants written by Don Janssen, “Humidity is very important to orchid plants. A relative humidity level of 40-80% is suitable. A gravel tray containing water can be placed under the plants to increase humidity levels around the plants. Make sure the bottoms of the pots are above the level of the water. Daily misting is also helpful.” Source: Institute of Agriculture and Natural Resources  of Nebraska Extension in Lancaster CountyThe article “Keep Those Orchids Blooming” written by Nina Koziol published in the Chicago Tribune said, “Orchids prefer humidity in the 40 percent to 60 percent range. A furnace or room humidifier can help as well as placing the pots on saucers that sit over a bed of wet gravel.”
Is watering the same as providing adequate humidity?
In short, no. Indoor orchids will benefit from more frequent watering, but that alone isn’t enough if the overall humidity levels are low. Don’t be mistaken – you can over-water your orchid’s potting mix and cause root rot, yet still have a poorly hydrated and unhealthy orchid in terms of humidity.
Before we talk about humidity, we have to understand air movement. The name “epiphyte” already implies that these plants grow in the air, as in contrast to soil. According to the definition in Wikipedia, “an epiphyte is an organism that grows on the surface of a plant and derives its moisture and nutrients from the air, rain, water (in marine environments) or from debris accumulating around it.” Understanding how air circulation works is vital to the maintenance of your plant.
There is no use in having humid but stagnant air. In fact, this will promote bacterial growth more than anything else. To survive the infrequent rainfall, the entire plant has adapted to retaining as much humidity as it can. They created pseudo-bulbs, which retain nutrient-bearing water, and the roots developed an outer layer of sponge-like velamen that soaks up water.
The leaves also evolved, transferring its “breathing” process to its roots. As any other plant that trades off oxygen for carbon dioxide, the orchid “breathes” through its leaves.
Seeing that this alone was not enough for proper survival, orchids shoot out areal roots which expand its potential to captivate the nutrients cascading from the overhead canopy of rain-forest leaves.
In this entire interaction of gas exchange, humidity is lost through the pores (stomata—plural, or stoma—singular). When the leaves come into contact with drier air than adequate, they will enter a water-retaining cycle to preserve the water inside their leaves. To do this, they close the stomata (causing one more problem). Now the orchid is not “breathing” in addition to being dried out.
How Inadequate Air Circulation and Humidity Create Death
Here is where our real problems start as in a line-up of falling dominos. Once the first falls, everything goes to pot.
Let’s look at the first fall: toxic gas accumulation. With the tightly packed potting medium, there is little room for air exchange (hence the use of slotted pots, or pots with air holes.) This gathering of unwanted gases is what really causes root rot, not the over-watering itself.
During watering, any available space that’s free is filled up temporarily, preventing gas exchange during those periods. If there’s not a proper drying out period to permit the roots to breathe again, the gas is trapped inside the roots, raising the percentage of carbon dioxide.
Second domino: the gas build-up will signal to the plant that there’s a chemical imbalance. To avoid suffocation, the orchid will automatically release phenols. This is the orchid’s response system that attempts to neutralize the toxins that are harming the roots, but phenols do much more damage than the carbon dioxide itself. When phenols come into contact with the roots, they turn brownish-black, which is what we call “root rot.”
Third domino: since the carbon dioxide cannot be released into the air, it will interact with the water, forming carbonic acid. This is a poison, as the name implies, and will also decompose not only the roots but the potting medium, too.
…and the other dominos fall one by one.
To avoid the first falling domino, keep ventilation high. The circulating air aids this gas exchange, forcing air into the slits in the pots. It also dries up any unwanted water around the roots and stem, which is necessary to avoid other problems.
In addition to these two, circulating air will bring new nutrients from one plant to another, simulating the natural environment of the rain-forest canopy.
How can you tell that your orchid is suffering from low humidity?
A few signs of poorly humidified orchids are found in the leaves will wrinkle and become crunchy or crusty. The overall look is that the orchid has dropped over, losing all interest in life.
For example, buy from bushy green spinach or broccoli from the grocery store. Without a bag, place it onto an open shelf in the refrigerator. Keep it there for a few days and see what happens. It shrivels up, loses its vibrant green color, becomes limp and saggy—the same thing happens to the orchid leaves.
How can you achieve sufficient air circulation and humidity?
This is the most important part of the article. You’ve read what the problems are, why the occur, but now it’s time to learn how avoid them (or fix them, if they’re already a problem).
First, you’ll want to know what your humidity ratings are. I suggest investing in an inexpensive humidity gauge that you can install next to your orchid. If by any chance you can’t find them at local garden shops, try pet stores, usually sold by the reptile tanks and vivariums. They usually run around 10 dollars or less. There’s no need to get a fancy one with thousands of extra readings, unless you want to set up a mini-green house.
Second, use an overhead fan with long paddles to have the air circulating at all times on a low setting, even at night. For higher humidity orchids, you’ll need to keep the gentle air flowing at all times. Many people make the mistake of turning off the fan at night. If you have lower humidity tolerating orchids, you may be able to turn the fan off. Higher humidity orchids prefer a higher air circulation. Know your orchids to properly provide for them.
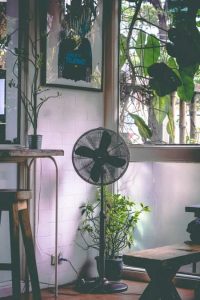
If you’d like to invest in smaller fans that direct the air flow directly to your orchid, that’s fine too, but not necessary. The only problem with these more compact fans is that they tend to be too strong, not having a low setting.
As long as the air is not making the leaves and flower spike sway with the current, you’re good to go. Circulating air that is humid is the secret to successful orchid growing, (after of course, all the basics like lighting, potting medium, watering and fertilization.) it.
The third investment is in a humidifier. If you are in a pinch financially or still just testing the waters, a solution to the humidifier is hang up wet towels in the room that your orchid is in. Unruly and fashion-breaking, yes. Does it work? Also, yes.
In Brazil during the dry season, humidity levels would drop below the Sahara Desert levels, and school would often be canceled. To bear such conditions during the six months without rain, we’d hang up towels during the day and wet them again at night. We’d also keep bowls of water in every room, which evaporated before the next day.
To heighten the levels of humidity around your orchid you can follow these ideas, which are all tested and approved:
Tip 1: Use water trays under the pots.
Pour a small layer of gravel, marbles, leca pebbles, lava rocks, or any layer of porous material into a shallow tray and fill it with water 2/3 of the way up. Do not let the bottom of the pot come into contact with the water, since it will interfere with the watering cycle, and we want to avoid that. Refresh the water anytime it becomes low.one, single tray won’t do the trick. In fact, it’s practically useless to use just one tray. You can test it with the humidity gauge. Under every single orchid pot there needs to be a humidity tray. Another solution is to use one humongous tray and place several plants on it, as if it were part of the floral design. Be creative on this one!
Tip 2: Group the plants together.
The gas exchange with the bunched-up plants will be better since the humidity coming off one will hydrate the neighboring plant. If birds of a feather nest together, then keep your orchids in a small huddle.
Tip 3: Get other household plants.
The more the plants inside, the more the humidity levels rise. Even though there have been many, many articles on the internet (usually not well-researched ones) stating that plants clean the air, it doesn’t raise the levels enough to be noticeable. From a health perspective, as to if it really makes a difference, there must be thousands of plants inside your living room—not the interior decoration I’m particularly looking for. As for humidity, they do an awesome job. My personal favorites are ferns.
Tip 4: Spritz the room with a spray bottle
Take this tip with a grain of salt…
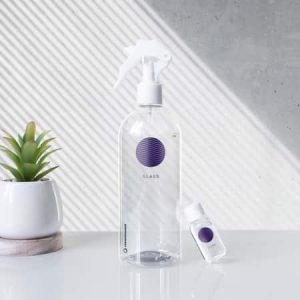
This is a temporary solution and a very time consuming one, but it works for a little bit. In one study, the initial humidity was 38%, and after heavily spritzing the room with water from a squirt bottle, in one hour, the humidity raised to 44%. Interesting enough, the article never stated what the levels were 2 hours after this process. In what I know about humidity, it probably went back down to 38%. So it works, but, well…
Tip 5: Make sure you use the right pots.
You might be wondering why, but think about it. The more tightly (or densely) packed medium, the less the roots will be able to breathe.
If you are growing hydroponically (in just water) use a pot that provides air circulation around the roots, more than you think is necessary. If you are using potting medium such as sphagnum moss and bark, don’t forcefully press it into the pot, allowing room for air to circulate.
Orchids are beautiful, but those pots…
Design esthetics demand we use pots that attractive, delicate, and visually appealing. We slide the Quasimodo-style inner pot with slits snugly into these “prettier” pots. Please don’t do that. Keep the ugly but functional pot, or as this tip indicates, slide it into an oversized pot that does provide air circulation around the inner “horrid” pot.
Tip 6: Use a top layer of sphagnum moss.
In this tip, lay a fine layer of moss on top the potting medium, away from the crown of the orchid and the stem. Allow plenty of room for new roots to grow, too. Don’t pack it on, but tenderly lay a fine coat of moss. Spritz this once a day. This is not for root health, but for evaporation purposes. The water will evaporate, and since the majority of the stomata are on the underside of the leaf, the water droplets multiply the direct humidity without interfering in the watering cycle.
Tip 7: Create a terrarium feel.
With this I mean trapping the humid air into a sealed Eco-system, where humidity won’t run away. This can be created by putting clear plastic over he orchids, like a covering for a well-pressed suit. Many times, supermarket orchids will come in a clear plastic surrounding the flowers and leaves.
You can set up a shelf of orchids too, with a zipped plastic around them. This creates an enclosure. There are some models on the market, but I have found them to be expensive and ugly. You can make one a home using a clear plastic drop cloth. This is my least favorite idea, since the whole idea is to display your orchids, not hide them. But this of course, is my personal opinion.
Tip 8: Buy a humidifier.
Most humidifiers are in the 50 to 200-dollar range. If you decide that you want to keep your orchid well, and the above ideas are time consuming or not just handling the job well, this is an investment that you won’t regret. Again, you don’t need the fanciest model on the market—any simple room humidifier will do.
If you need suggestions, this article compares the cheapest (yet most durable) brands on the market and ends with the one I use in my home office. It’s a great read if you’re interested in purchasing a humidifier.
Now that you know all about humidity, what distress signs to look for, and how to raise humidity levels, it’s time to get your hands dirty. Check out some of our tutorials on watering while on vacation or mounting orchids on trees.
Don’t Stop Learning!
If you want to be included in more information and get a 14-page fertilization guide, please sign up for my newsletter. I don’t spam, but send emails out bi-monthly with some curious topics of interest. If you want more information, click here to go to a specific page on this website where I explain it more in detail.
Also, if you are looking for an orchid journal to keep your notes specifically about orchid care, check out my 2 solutions for that on this page. If note-keeping isn’t your thing, then there is a free excel spreadsheet that you can download. Click here for more information on how to do that.
If you subscribe to my newsletter, I will send you a 14-page guide on the main tips of orchid fertilizer. It is downloadable and you can print it out on your computer. I designed the guide to double up as a coloring book, just to make it fun.
If this information was of any help or clarified any doubts you had, please mention so in the comments. I love to interact with other orchid enthusiasts, and we can share from our experiences. Share this page to a friend who has an orchid, comment, or give me a thumbs up 😊 in the comments below.
Happy cultivating!

Great info…thank you finally some straight answers that make sense. Would luv to get your newsletter.
Kathy Mahaney
Kathy,
I must say your explanation of ideas on how to create humidity was great. After reading I’m possible that is my issue with 2 plants for sure. Maybe others.
I need your help please? I’m in Fla growing Cattleyas in my lanai screen room that faces East. It’s summer time and my issue is getting more humidity.
Mistake at this time: I have 2-small fans & yes I thought high was better. Obviously I will change today!
I have small table on wheels{I can’t pick up too much weight, Polio survivor}. I like the plastic bag idea, but I could not find a bag big enough, any thoughts?
If I go to the pebbles in a tray how often will those pebbles need cleaning?
p.s. By the way I’m in our Orchid club & your explanation was the best I’ve heard.
Thank you, Scott
I have four good, healthy looking Phaleonopsis orchids [about 2 months old now] and the ONLY concern I have is that the AERIAL roots on some of them look dried out – not plump and green. I have room fans on in the ceilings so the air is moving. My humidity meter says 42*. How to get nice, plump, green aerial roots, which I assume is THE SIGN of healthy orchids, yes? Thank you. RN