
Orchids don’t need to be tucked away under grow lights or just crammed into a corner of the best-lit window. You can hang your orchid in an overhead basket, and watch it cascade down into a beautiful waterfall of flowers. Orchids in hanging baskets are often one of the best ways to display orchids, and contrary to popular belief, they aren’t much different to care for if you take the following precautions.
Another great positive point for hanging an orchid in a basket is the space that you can save. When the window sill or the table by the window becomes crowded, hanging orchid baskets can be a way to salvage each ray of filtered sunlight that comes through the window. Many people ignore the ceiling as a space-saver, and hanging baskets can amplify your available space…because let’s face it, we always end up purchasing one more orchid…and another…and another.
Overall Details of a Hanging Basket Orchid:
Time: 20-30 minutes
Cost: Under US$ 10.00
Difficulty level: Beginner
Duration: 2 years
Choosing the Right Orchid
First, chose the right orchid. It will make a huge difference if you get a humidity loving orchid in a hanging basket, and in a couple weeks it withers.
What orchids are best for hanging baskets? This will depend mainly on your environment and watering schedule. If your house is extremely dry and you don’t have a humidifier, then select orchids that prefer to have a dryer period to those that like constant humid roots, like Vandas, Cattleyas, and Dendrobiums.
Hanging baskets will dry out faster than orchids in pots on a table or window sill. Air circulation, which is absolutely necessary, will make the orchids dry out faster and remain dryer for longer periods of time. This is why the roots need to be healthy and plump. Don’t try to hang an orchid that is on its last leg (or root). For that, use the Sphag-n-bag method, which you can read here.
Choose an orchid that not only likes to dry out, but also is in upmost health. Why? Because it’s going to go through some serious life changes in hanging basket. Everything it once knew will change: the lighting (the hours will change that the sun comes in the window the higher your orchid is hanging), air circulation (it will be more susceptible to currents and wind), watering (to water an hanging basket, you can take it out and put it in the sink, but I don’t recommend it, so watering methods will change), and so on…
You get the idea.
Decide where you are going to hang the orchid basket: Indoors or Outdoors?
The adaptation to a hanging basket will take a bit of time for the orchid to get used to. If you are doing this project and plan to hang your orchid indoors, then the display will last for around two years, but the adaptation time might be less. You can more easily control the climate, temperature, humidity, and lighting indoors better than you can outdoors.
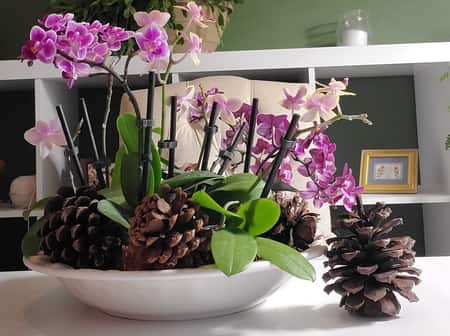
Image Copyright by Orchideria.com © 2020
Working on an orchid hanging basket before I hang it up in my home office.
Image Copyright by Orchideria.com © 2020
Outdoors will vary more on how long it takes your orchid to adapt to the basket, and depending on your region and care conditions, it’s life might be longer or shorter. There’s really no real way to tell. Test and test again until you find the right place for your orchid…
For my conditions, it’s always indoors.
Before you start: What not to do with your Hanging basket
One idea that will fail your orchid display 100% of the time is if you unpot your orchid, or several orchids, and place them into the hanging basket without their pot. Keep each orchid in its individual pot.
Orchid’s don’t like to have free roots, and prefer to be pot bound (Vandas are the exception). When you place them into a hanging basket with their original pot, they will suffer less adaptations and thrive quicker. Without the pot, their roots will wander aimlessly, searching for the sides of the pot to attach themselves.
You’ll have to hide the top of the pot with either bark or moss, so your hanging basket will look more professional and cleaner. Keeping the orchid in its individual pot will also aid when it comes to watering and providing solutions to pest control, like pesticides, insecticides and others.
If one of the orchids in the hanging basket becomes sick or develops “issues” you can easily remove it without disturbing the other orchids around it. If you want more info or planting two orchids in the same pot (community pots) read this article, where I detail the pros and cons and list a few secrets of doing this right.
Materials To Use For Your Hanging Basket:
The materials used for hanging baskets can be quite varied. The simplest design is to use the same pot your orchid is already in, add wire hangers, and attach it to the ceiling or wall hooks. Of course, this isn’t very stunning or appealing, but it does save space.
If you opt for this option, you can make the pots they come in ornamental—no ugly transparent orchid pots with slits—or spruce up the wire they hang from.
Another solution is to add charm to the wire itself. Hangers can be made from macramé, or woven twine. This arrangement won’t last as long since water will deteriorate the threads, and you’ll need to exchange the entire setup after some time…but it adds class to an ugly orchid pot.1) The basket itself:
In this tutorial, I’ll be using a hefty metal basket than can be purchased from most all department stores like Lowes, Home Depot, Menards, or a bigger floral center.
You can substitute for chicken wire, thin metal wire that you intertwine yourself, or even a repurposed fruit basket.
Use your imagination—sometimes the most uncommon things make the prettiest hanging baskets.2)A liner:
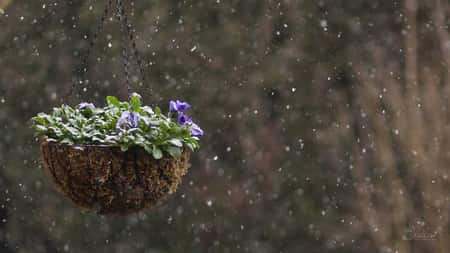
I’ll be using coconut husk already preformed into a circular bowl. If this isn’t available, use Spanish moss; just pack it in tight so it forms a solid ball. You can be creative on what type of material you use, just verify that air can pass through it. Orchids need to be able to have ample access to oxygen.
Just to clarify: notice the picture below. If this type of mount is what you’re aiming for, this unfortunately isn’t the right tutorial. The wooden basket mount is more appropriate for Vandas and will not require a liner. The process to make it is a bit different than the hanging basket. Hanging baskets, like the one in this tutorial, are more commonly seen with spring flowers.
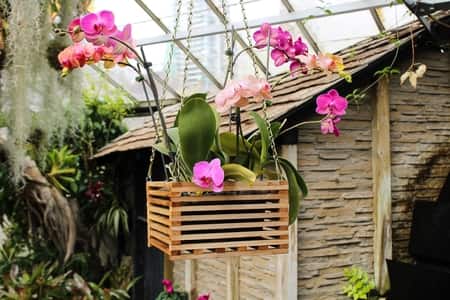
Hanging Baskets can also be made from wooden baskets, but the process to mount them is a little different.
3)An orchid or two:
If you are planning on using multiple orchids, try to pick some that are of the same genus and species. It will make watering, fertilizing, light requirements, heat preferences, and general care a lot easier.
If you chose 2 orchids that don’t have the same preferences, then you’re setting up your display to be short lived.
I prefer to pick two orchids that are of the same genus and species, but slightly different/contrasting colors. I think it adds that special touch to the display.4)Top Filler:
This can be sphagnum moss, Spanish moss, or even orchid bark. You can get creative here as this will only serve to hide the top of the pots so it tricks whoever walks by to think these plants are free in the hanging basket.
If you look back to the picture I used above, I used pine cones.5)A ceiling attachment or hook:
I just added this here because you don’t know how many times I had to actually return to the store to pick these up. These always slip my mind when making a list for hanging basket orchids.
Add a chain as well, to regulate how high you’ll want the display to be. As you can see, most the materials you probably already have laying around your house. It’s a simple project and doesn’t take long to make, mount, and hang up.
Step-by-step Guide of How to Display Your Orchid in a hanging basket
1) Lay the filler inside the metal form.
If you go with Spanish moss, then pack it down pretty thick since the orchid pot will be sitting on top of it. This layer will keep a little bit of the humidity and prevent the whole floral design to completely dry out, but Spanish moss will absorb less humidity than the coconut fibers/husk will. I personally think that the Spanish moss is prettier, but just add a mental note that this layer will affect how often you’ll be watering or misting.
2)Place the orchids in the frame
Place the orchids in the metal or wire frame and arrange them so they are all the same height; stems at the same level of the side of the pot.
If you are using two or more pots, they can be close together, as long as one isn’t buried lower than another. All the stems need to be at the same height. This will affect watering and misting. If one orchid is lower than the other, it will get more water and less light—two ingredients for stem rot.
Add some bark or charcoal under a pot if it is smaller, just to raise it up to par. If one pot is lower, it will be the first to suffer from the display.
3) Fill in orchid bark around the pots to secure them.
It doesn’t have to be orchid bark. You can use other material too—just don’t use dirt, soil, or houseplant potting medium. Dirt will suffocate the pot inside the hanging basket, and orchids like to have air circulation around their roots.
The whole idea of drilling holes in the sides of the basket is to have adequate air circulation. The Spanish moss and coconut husk will already hinder some of the air, but they are essential for trapping in humidity.
But if you put soil, dirt, and other compost in the hanging basket, your orchid will die.
Make sure whatever you use has proper ventilation and the orchid can breathe, but is strong enough to hold the pot in place.
4) Level the tops of the pots with sphagnum or Spanish moss.
This layer is just thin enough to hide the tops of the pots, so they look like one continuous plant in a hanging basket. If you have a cascading orchid, and you hang it high enough toward to the ceiling, you can skip this step.
Note that this also provides an extra layer of humidity, and not using the top layer will force you to mist and water more often.
5) Hang your orchid.
You’d think this would be the easiest part. It’s not. Sunlight that pours int o the window in the morning will not be the same if your orchid is closer to the ceiling. It’s considerably harder to get that kind of sun early in the morning on good angles.
Hang your orchid low enough so the leaves will still get filtered sunlight, but high enough it won’t hit you in the head or obstruct your view of the outside window. There is a sweet spot that is just right.
Remember the chain I added in the materials list? Well, this is where it comes in.
Hang your orchid and wake up before dawn. See where the angle of the first rays come in the window. You’ll need to adjust the height, so that the leaves get no more than two hours of sun.
If you have a west window, the same applies, but go out in the late afternoon and just observe.
Now, if you’re indoors like me, and no sun works, then keep the grow lights on but not too close. Each orchid will have their preference, and most Vandas and Cattleyas love the higher light requirements. Read up on you orchid to know where to place it, how high, and what the right amount of light is necessary for it to thrive with indoor lighting in this article.
6) Enjoy.
Sit on your porch, home office, couch, or favorite chair; kick your shoes off, and relax. You’re done. This is the best part—enjoying what you’ve done in a little time. Now that you’ve made a hanging basket, you’ll need to carefully monitor it for signs that it is not adjusting too well. Orchids don’t like to be moved. They prefer to stay in the same place from the time their born. It’s normal to have a little wilt, both in the flowers and the leaves, but if this wilting doesn’t plump back up in a week, you need to water some more and check the humidity levels.
If after reading this article you think that this might not be the project for you, how about different plant shelf ideas? In this article, I suggest a few uncommon things that can be used as plant shelves, and recommend a few others that I thought were worth the value.
In all, I really hope you do try planting an orchid in a hanging basket. Try the idea with a cheaper orchid (I have a collection of mini-Phals I use for my DIY projects, and see if it works for you.
The success of failure of this project will depend mainly on your environment, your watering and misting routine, and the time you can dedicate to keeping an eye on your orchid. So it’s not an all fail or all success rating. Start with the smaller orchids, and work your way up to a cascading orchid, that flows down with full beautiful blooms.
Don’t Stop Learning!
If you want to be included in more information and get a 14-page fertilization guide, please sign up for my newsletter. I don’t spam, but send emails out bi-monthly with some curious topics of interest. If you want more information, click here to go to a specific page on this website where I explain it more in detail.

Also, if you are looking for an orchid journal to keep your notes specifically about orchid care, check out my 2 solutions for that on this page. If note-keeping isn’t your thing, then there is a free excel spreadsheet that you can download. Click here for more information on how to do that.
If you subscribe to my newsletter, I will send you a 14-page guide on the main tips of orchid fertilizer. It is downloadable and you can print it out on your computer. I designed the guide to double up as a coloring book, just to make it fun.
Happy Cultivating!

Thanks Amanda great ideas, keep up the good work.
Just Great infomation
One point I like to make different areas states & country. ..zone’s
Does be taking in consideration.
Indoor ….anywhere …dry areas most poor air circulation,must bring up the humidity also a Fan make WONDERS…60 – 80 Most ranges.
Porch patios / out door changes constant & quickly…keep attention keep ranges 55 -85
Any rapid change ..keep an eye…move only when necessary water outdoor 2-3 times per week.hot or cold weather….if heavy rain 1- 2 time a week water them.And yes you can have Orchids all year….and think Tropical.