
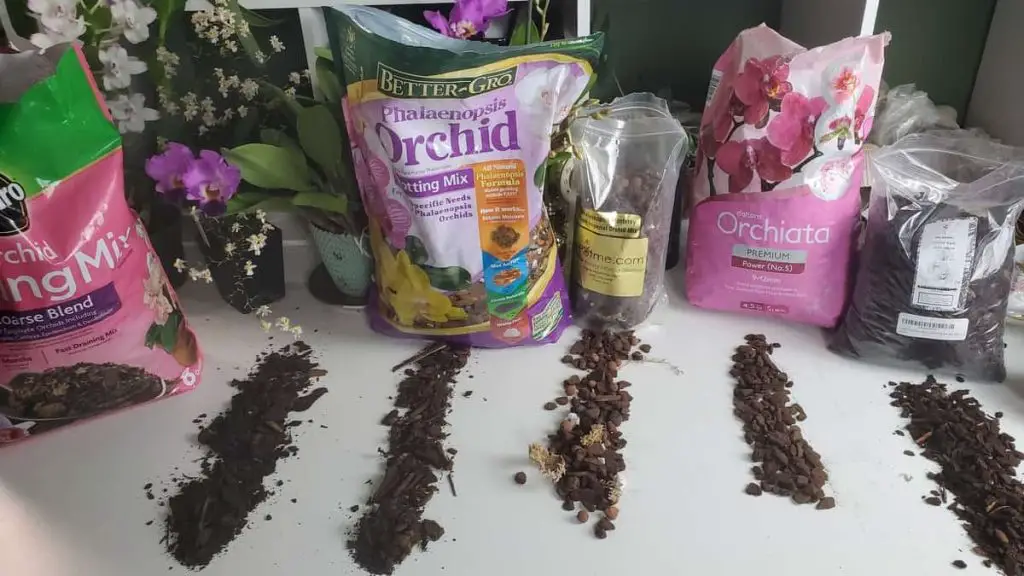
With so many varieties of potting mixes, how do you know which one is the right one for your orchid? The main difference between orchids and your other household plants (in terms of potting medium) is that 70 % of all orchids (denominated epiphytes) aren’t planted in soil or dirt. Their potting mix is exclusive to them, and if you plant them in the dirt, they will soon present problems that will lead to their death.
What are orchids planted in? A variety of media or orchid mix can be used, like fir bark, sphagnum moss, perlite, charcoal, lava rock, osmunda fiber, coconut fiber, redwood bark, and others. To prepare your own potting mix or choose the right store-bought one is to try to imitate the exact conditions that the orchid grows in nature.
Think back a bit about orchids in their natural habitat. Theses exotic plants don’t grow on the ground. Their seeds nest into the bark of high trees, where they find all the right conditions to grow. These conditions are:
fixation,
humidity,
light,
temperature,
air circulation,
and adequate nutrients.
Orchids are more popular among tropical and subtropical rain forests, where hot and humid days are usually sparkled with unpredictable rainfall. Humidity is held at a constant high, anywhere around 60 to 80%.
The temperature, also high, falls around 15º F (+/- 8º C) degrees at night.
Looking for support and fixation, they spread roots outward, some to capture nutrients, others to fixate on the bark. High off the ground and far from the soil, orchids rely on the micro-nutrients floating in the air and condensation rich with debris dripping off tree leaves above them.
Their flowers grow toward the light, seeking the fastest, most direct route. Their leaves will shift that way, too. Light is extremely important for the orchid roots, so when picking a potting medium, make sure it’s not compacted or so thick, that some light won’t penetrate.
Recreate those same conditions in your pot (fixation, humidity, light, temperature, air circulation, feeding, and potting medium) and your orchid will thrive.
These are a lot of items, but in this article, we’ll focus strictly on the potting medium and how each of these items pertain to potting mix.
1) Fixation: Potting Medium Provides Foundation
The potting mix will need to provide something firm for your orchid to grip and wrap its roots around. Take a look at the moth orchid (phalaenopsis). The large, thick leaves and long, overpowering flower spike weigh down the orchid—usually in one direction—only relying on a small root system to hold the plant in place.
Without proper security or at least something to wrap its roots around, your orchid will not bud, bloom, or even produce new leaves. Because the root system needs to grasp something firm, many orchid roots seek to come into contact with the sides of the vase.
This creates a feeling of structure and security.
It also explains why the roots are so densely compacted around the outer portion of the pot, rather than in the middle.
If you pick up a transparent vase, you’ll notice this phenomenon.
Believe me, they aren’t cramped. They are quite happy this way.
This is also good to note later on when it comes time to insert stakes. Since the roots will extend to the sides of the pot, it’s safe to assume the middle of the vase has fewer roots. Insert your stake near the middle.
Good ideas for hard elements that provide firmness can be:
- gravel,
- lava rock,
- fir bark,
- leca pebbles,
- or even aquarium rocks.
All these have one thing in common: they are sturdy and won’t decay. The fir bark is the exception, but it still provides a surface for up to 2 years that the roots can adhere to.
2) Texture: Coarse-Grade versus Fine-Grade Potting Mix
The texture of the potting medium is very important. Before you stuff your potting medium with large chunks of charcoal or tree bark, observe the size of the roots.
An orchid with smaller roots will prefer a small, fine graded medium. An older orchid is more prone to cling to bigger, medium grade-mix. This is a general guide, but you also have to take into consideration each orchid species.
Finer grade medium makes it harder for water to run freely through it, creating a damper environment inside the pot.
Orchids who love humidity would be more prone to succeed in a finer mix, like oncidiums and miltonias.
3) Excellent Potting Mix Provides Adequate Air Circulation
Air circulation is a necessity, even in the potting mix. The source of nutrients for an orchid doesn’t come from the ground or soil, but from the wind. Orchids, as tree dwellers, realized that it would be unwise to not have roots branching out into the atmosphere to capture these extra minerals.
They adapted to form aerial roots. This is important because not all roots will be growing down into the potting medium. Some roots that the orchid produces which travel parallel to the potting mix.
Do not bury these. They are perfectly happy “doing their thing” above ground.
The potting medium must simulate the freedom of having a wind current or air calculation inside the pot. This is the number one reason soil or dirt is not used. Oxygen, nitrogen, and hydrogen must freely circulate.
3A) Avoid Potting Mixes That Are Too Compact
If you have a substrate that is firmly packed, no air will reach the roots. This can also happen over time, as the natural elements start to decay and mulch together with the weight of gravity pulling the top-heavy plant.
Although the roots like a humid environment, these striking plants need the air to dry them out.
Without air, the roots will start to decay, turning dark green then brown, later disintegrating into the potting medium.
3B) Over-watering prevents Air Circulation
A common culprit of providing humidity but no air circulation is sphagnum moss. When dry, as it comes in the bag, it absorbs moisture and withholds its shape well. But get a fist full of wet sphagnum moss and squish it into your hand. It will compress easily and form a tight ball…and it will stay that way.
This tight wad of moss will not let air through it and will decompose more quickly. It will also be the perfect habitat for a mold culture—which you don’t want. Yet this is what happens to sphagnum moss of the course of two years.
New sphagnum moss is excellent at the beginning because of its natural format, allowing ventilation to move through it freely. Yet keep a close eye on it, since it has to be repotted every year to every other year.
Elements that can be added to a pot to promote proper gas exchanges are:
- perlite or sponge rock,
- gravel,
- bark.
3C) Choose a Pot with Plenty of Ventilation Holes
Choosing the right pot is essential for proper circulation. Verify if there are side holes, or slats, where air can enter and exit freely. Too many holes can lead to excess dryness—too little, root rot.
Both will kill your orchid.
If your orchid is still drying out, then check to see if it is in the path of an air vent from the floor or ceiling. Although orchids love the air, this unnatural ventilation (either too hot or too cold and always too dry) doesn’t help the orchid.
If there are no vents nearby, then repot your orchid with more substrate that retains humidity. By the way, if you’re looking for ideas for different sized orchid pots, check these pots out on Amazon (Affiliate Link).
4) Potting Medium Enhances Fertilization
In the rain forest, nutrients and minerals absorbed by aerial roots are varied and well balanced. Other leaves and flowers disperse additional nutrition, which can’t be said about the stale air in our living rooms.
A potting medium that absorbs the bi-monthly fertilization but doesn’t accumulate salts is preferred. We suggest twice a month, the usual schedule for fertilization, but research your specific species for additional information. Each orchid has precise preferences and necessities.
The problem with most potting mediums is that they are rich absorber for everything they come in contact with.
They absorb water, but also minerals released form fertilizers. If you happen to fertilize too much, the medium will absorb the chemicals in excess, causing root burn.
The ideal potting medium will be able to absorb the fertilizer, but also allow a free release when washed out and rinsed with water. Always rinse your potting medium after utilizing fertilizer. This washes away the excess fertilizer and avoids salt residue, or salt build-up on the top of the pot.
The number one element to avoid for this is sphagnum moss. Even though it’s very beneficial, as you can check out in this article, it does absorb way too much. Many orchid enthusiasts are cutting back on sphagnum moss and using only leca pebbles.
5) Potting Mix will Allow Good Water Flow
Drainage, drainage, drainage. The potting mix needs to let the water rinse out quickly. The roots need to be able to have access to the water and when enough is enough, they need a quick exit to be able to breathe again.
If your orchid is taking too long to drain water, then you need to replant it with bigger elements. Be creative: you can use marbles, aquarium pebbles, or lava rocks.
Bigger elements provide a wider surface area, but also, a more direct one. Think of an obstacle course: a straight line with only two curved obstacles is easier and faster to finish than the same line with 15 or 20 obstacles to overcome.
5A) Important Tip: Don’t Ice Your Orchid
For the love of everything and anything sacred,
DON’T PUT ICE ON YOUR ORCHID.
You might say that you’ve done this a million times and your orchid is fine. Just because you didn’t kill your orchid by icing it, doesn’t mean it’s the right way to do things.
I can’t tell you how many videos, websites, posts, pages, and podcasts I’ve witnessed where people give this advice.
If anything, rain comes down like hot tea. (Please don’t steam your orchid, either.) Use warm or tepid water—not too hot, not too cold. A little warmer than cooler is actually better. Ice is only easier for a person who doesn’t want to take the time to properly water your orchid. To us at Orchideria, it screams of “plant abuse” if there ever was such a thing.
I just had to get that off my chest. 😊
Anyway, back to watering and potting medium… Water from rain comes fast, drenches the roots, and dries up quickly. This is why you need to run water over your orchid for a whole minute, letting the roots soak up the water. Try not to get the leaves wet when watering and dry off the leaves immediately. Leaving water near the base of the roots will cause the stem to decay.
5B) Important Tip: Why water if I mist my orchids?
Misting orchids can be extremely beneficial if done correctly—deathly if done wrong. When misting, water accumulates on the roots, leaves, and flower spike.
Don’t mist near the crown (or stem). Minuscule droplets of water will hydrate and elevate the humidity, but if left sitting on the leaves for hours on end can cause problems.
If you have a good fan that can dry up the water droplets from the mist quickly, then misting is actually the best solution.
6) Humidity: Too Much or Too Little
This is where many people make their biggest mistake, thinking only watering the orchid is enough. Humidity is a whole different ballgame. Found originally in humid natural environments, orchids prefer potting mediums to be humid, but also allow a quick-drying period. Under the canopy of overhead leaves, orchids receive abundant airflow, drying out the root.
Your potting medium needs to provide humidity, but also a quick-drying period.
If your orchid is drying out too quickly between watering, you can either water it more times during the week or trade your potting medium to add more elements that promote humidity.
Each orchid has an irrigation and humidity schedule that they prefer.
With a potting medium that holds too much humidity, the tiny white hairy structures on the roots (called velamen) will start to decay. As in any compost pile, the decay will call a party for a mold culture, which in turn, will cause root rot throughout the pot.
Pretty soon, your orchid is dead.
A hard task for the potting mix is to provide just the right amount of humidity so the roots can soak it up, yet let it air out in time to not promote root decay. This is where softer materials come in handy, like sphagnum moss, charcoal, and natural fibers like coconut husks.
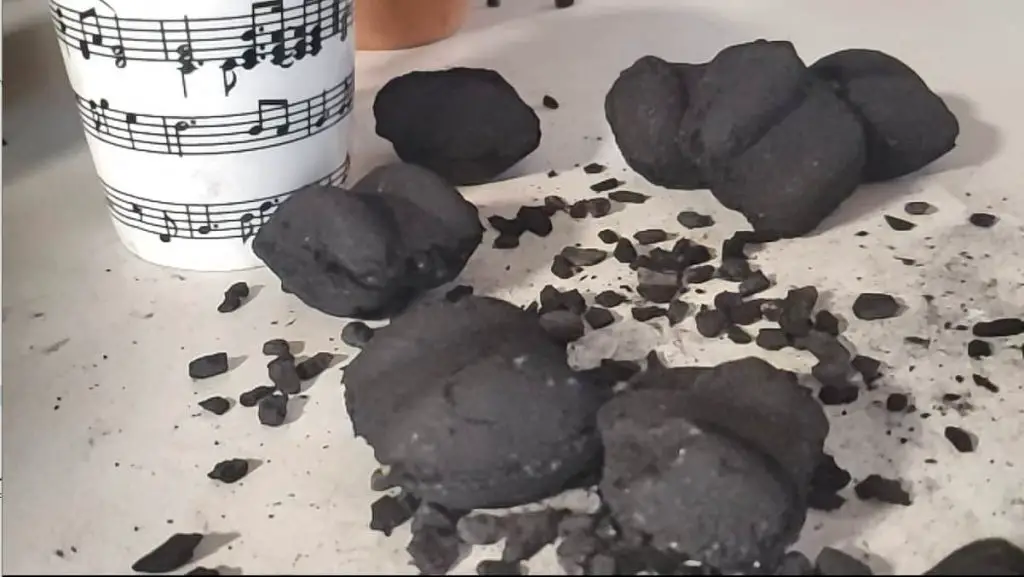
6A) Charcoal – An Excellent Addition to Potting Mix
Charcoal is an element that works well here. It can absorb some humidity, but not a lot. It’s perfect because it also absorbs contaminants in the potting medium and eliminates some of the odors.
I use charcoal in almost all our designs, just to keep the humidity. It drains well since it’s bigger, promoting the elimination of harmful bacteria. Taking out the mess it is to deal with, charcoal only adds positive notes to our floral designs and terrariums. If you’re looking for a good brand of charcoal or activated carbon to purchase, this option (Affiliate Link) is what I buy.
6B) Natural Fibers, like Coconut Fiber, Are Essential
Coconut fibers (husks) and some tree barks are good at absorbing humidity, too, like fir bark. Water will soak into the bark and take a longer time to leave, giving the plant humidity long after you’ve taken it out of the kitchen sink.
Beware of adding too many coconut fibers. They tend to have salt residue. Before adding them to any potting mix, be sure to rinse them out. It would be better if you can soak them in water from one day to the next. If this is not possible, use hot water to rinse them out thoroughly.
6C) Floral Designs that Incorporate Hardscape Materials
Another way to promote humidity is in the hardscape of your design. Place your pot in a low container with pebbles, and fill with water. In our dry, air-conditioned, and gas-heated houses, the ventilation is constantly dry and not moving.
A tray of water will evaporate upwards, reaching the leaves and air roots. This is an excellent way to provide a beautiful and purposeful design, addressing humidity issues.
Please note that if you do have the full name of the orchid, you can research it and get its full information, since there are many, many species in each genus, and they can vary with care from one to another. The humidity, on average, needs to last about 7 days, which is why most orchid growers say water weekly.
| SPECIES | DAYS IN BETWEEN WATERING | POTTING MIX |
| Dendrobium Vanda | 3 or less | Coarse-grade |
| Cattleya | 4 to 7 | Coarse- to medium-grade, absorbent |
| Cymbidium Paphiopedilum Phalaenopsis | 7 | Medium- to fine-grade, highly absorbent |
7) Good Potting Mix Allows Orchid Roots to Have Light
Orchid roots also photosynthesize through chlorophyll. When they are wrapped around a tree, they’ll be blessed with constant sunlight, filtered by the trees leaves.
This is the number one reason orchid enthusiasts use transparent, plastic potting pots. They are ugly, yes, horrendously so. But their functionality exceeds their beauty and that is why I use them, too. If you’d like more information on adequate pots, read this article.
As mentioned before, the orchid roots wrap around the sides of the pot naturally sticking to the plastic sides. Light can pass through the clear vase and some kinds of potting medium, giving them another way to provide substance and promote health.
If orchids are sitting in potting medium that’s too compact or doesn’t provide space in between the various elements, (translation: they don’t provide adequate lighting) they’ll need more nutrients in the long run.
How to Plant with the Correct Potting Mix
The basics of what and why each element is important to the potting medium was covered above. There is one more thing that interferes with potting medium: how to use it.
Number one rule: avoid smashing down the substrate.
To pot your orchids, make a mound in the middle, like a tiny volcano. Place the roots outward, embracing and extending to the sides of the mound, but not touching the sides of the pot. Adding potting mix around the exterior of the roots, up to the crown.
Here is where lighting is important. Don’t cram your potting medium down into the exterior sides of the pot. You aren’t planting a tree. Many of us push the orchid down to make sure it’s firm—like a tree—then give the orchid a slight tug. Yep, secure. That is perfectly fine. The bad part is when we don’t stop. We then slap tons of more substrate on top of the orchid, weighing it down even more.
NOOOOO!
The substrate must be firm, but that doesn’t mean compact.
Allow light and ventilation to penetrate the interior of the vase and your orchid will thank you with a gorgeous bloom.
Make Your Own Potting Medium
You can make your own potting medium by selecting the properties that your orchids love to live in and recreate that.
A) To make a finer potting mix for your orchid, you need to add:
- 4-parts fir bark or fine grade coconut.
If you don’t have these, you can use husk chips or redwood. - Add 1-part charcoal, but make sure it’s broken into smaller, finer pieces.
To save on money, you can buy the cooking charcoal you use on the grill, just make sure there are no artificial additives (like scents and fire inducing chemicals…). Buy the charcoal with the least number of extra additives possible. After all, you don’t want your orchid smelling like smoked bacon. - Finally add 1-part horticultural-grade perlite.
You can change this for small-grade aliflor (clay pebbles) if you’d like.
B) To make a Medium Mix for your orchid, you need to add:
Instead of using a fine grade fir bark, use a medium-grade one. Then follow the same recipe as above, maintaining the same proportions as above, 4 to 1 to 1.
A medium-grade mix (or medium-medium…LOL) usually more appreciated by cattleyas and phalaenopsis, and more mature orchids, since their roots are larger.
Don’t Stop Learning!
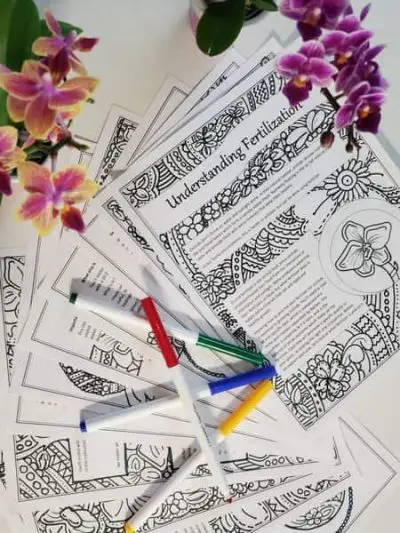
If you want to be included in more information and get a 14-page fertilization guide, please sign up for my newsletter. I don’t spam, but send emails out bi-monthly with some curious topics of interest. If you want more information, click here to go to a specific page on this website where I explain it more in detail.
Also, if you are looking for an orchid journal to keep your notes specifically about orchid care, check out my 2 solutions for that on this page. If note-keeping isn’t your thing, then there is a free excel spreadsheet that you can download. Click here for more information on how to do that.
If you subscribe to my newsletter, I will send you a 14-page guide on the main tips of orchid fertilizer. It is downloadable and you can print it out on your computer. I designed the guide to double up as a coloring book, just to make it fun.
When is the best time to change the potting medium?
Provide fresh potting medium before you introduce your newly acquired orchid to the rest of your orchid collection. Many people will buy an orchid and as soon as they get home will repot it.
We tend to think that the pot is too small, judging by the size of the flower and the disproportional vase it comes in. So, we repot it immediately in a huge vase. To the roots, this is a panic attack.
If the orchid is in bloom DO NOT repot it now. Wait until the flowers have fallen off and then, after trimming, set out to repot—if you can. Yet, it’s best to risk a setback than to contaminate your other orchids with whatever is on your newly acquired orchid.
Now that you know all about picking the right orchid potting mix, it’s time to get your hands dirty. Check out some of our tutorials on how to design a great floral design or build a terrarium with orchids.
Ready to purchase some orchid potting mix? If you are wondering what orchid potting mix I use, well… That’s hard to say. Each orchid has its own preference and I try to adapt with what it’s likes and dislikes are. For starers, I recommend you get a bag of general orchid bark (Affiliate Link) that is a all-for-one type bark but of an excellent quality, and adapt it with Sphagnum moss (Affiliate Link), Charcoal (Affiliate Link), and Perlite (Affiliate Link). That is a good recipe to start off as a beginner.
If this information was of any help or clarified any doubts you had, please mention so in the comments. I love to interact with other orchid enthusiasts, and all can learn from our experiences.
Share this page with a friend who has an orchid, comment, or give me a thumbs up in the comments below. I’d sure appreciate it.
Happy cultivating!

Thank you very much for this article. This was a big help for me.
Hi Fjóla,
I’m so glad it helped! Thanks for commenting, and I wish you the best with your orchids!
Hi. Hope it’s not too late. Moved to a new home and many orchids were gifted. We heard “sky planting” was ideal and watched YouTube and literally did everything you said not to 🙁
We reported every single blooming plant into pots with bark and hung them. It’s been about 10 days and I noticed some roots looked dry at the base. Worried I took them out of the pot and the roots are rotting.
Can they be saved? I literally have 7 plants and lots of time energy and $ invested and I’m killing them and I’m devastated. So grateful for any help.
Hi Jenn,
I’m so sorry to hear this. Since they have been repotted twice, I would keep them where they are this time. Orchids are resilient (to a certain point) and they should bounce back. Even though they lost a lot of roots, if the conditions are right, new ones will grow back in time. Keep the humidity high around the leaves and new roots will grow. I’m glad you took action when you did. That was fundamental in saving them.
I’d like to receive your bi-monthly orchid newsletter
Hi Bonnie,
You can click on https://orchideria.com/free-fertilization-guide/ where you’ll get the fertilization guide for free and your name will automatically be put on the newsletter. 🙂
Never had orchids until my sons gave me 2. Today we had a torrential rain storm and all my potting medium literally came out of the pots. I had them out on the deck on a table since we have been having 80’s- 90’s with high humidity. So far they have been loving it, but now I have about 1/2 of the medium left and that’s for 2. Tried picking up as much as I could from the ground and have it drying on a sheet pan. I do not know the kind I have since they came from a grocery story with no care ticket with them. I will be going out later to look for orchid potting medium. I live in Chicago and have access to Menards, Home Depot, and some high price nurseries. What else could I do to help my plants? They are done blooming and flowers have fallen off about a month ago.
Hello Amanda,
Awesome website! Well I’m computer illiterate. It’s probably not a website. Not even sure how I stumbled across you but I am so excited because anything I could ever want to know except for one thing, you cover it with great explanations. What I did not find, maybe I just didn’t find it but I’ll bet you know the answer lol. I have a Kiki and the mother plant is doing very poorly trying to keep her alive but the stem that the Kiki is growing on is dying and the kikis not getting water. It’s withering up. Please tell me you know what I can do! It’s so special when you get a Kiki without doing anything special. Thank you in advance Amanda and I look forward to hearing back from you.
Kathy Bartz
P. S. There are not any roots on the Kiki yet and mom might only have one. The Kiki has about four leaves. The longest one being maybe 2 in.
Also, would you be able to email me your response or text me or call me because I’m afraid if you post your answer here, I’ll miss it.
Finally, all the information in one place! Please put me on your bimonthly newsletter list!
I was given an orchid that was literally dead. Asked to revive it. I checked out alot of advisor’s and just took bits from everyone. After about 4 months I got a stem with 7 blooms on it and than as they after about 5 months started to die off I found another stem coming through. It’s about halfway up the first stem and there are still 3 flowers on the first. I had someone say that make home was perfect for growing orchids and she has offered all of hers to me. I was thinking of propogating from the first stem. Any advice there.
hi, i got a phal orchid it has small flowers but big leaves. the leaves fell off after the flowers did so i repotted it. they came in two seperate small plastic connnnnnntainers together in a beauifil clay plot. when i took one out out it hadd whieish grey roots and i ssoaked it it but it didn’t turn grreen. the other one has new leaves. i just bought new plaastic potss withe holees and spagham moss anns medim bark mulck and root fertilizer. How do i go about repotting them? thank you, Linda