
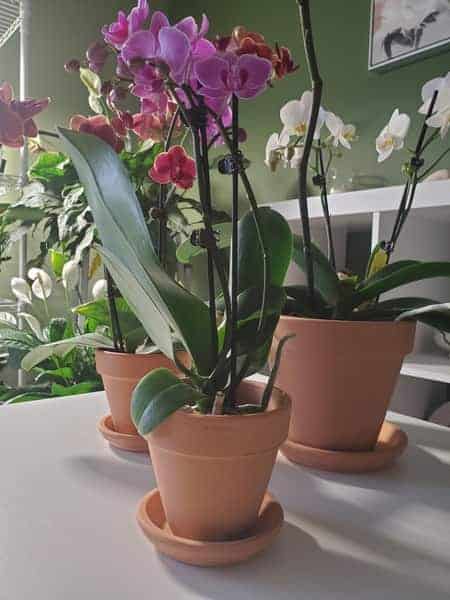
Mounting orchids on clay pots is a feasible way to grow cool-growing orchids. Because clay pots retain more moisture than the normal, clear, plastic pots and cool the temperatures that are in contact with the roots, cool-growers thrive when mounted on terracotta or clay pots.
How do you mount orchids on a clay pot? First, you’ll need to soak your pot in water to saturate it. Then you position your orchid onto the pot so the maximum root surface is directly touching the pot. Fasten firmly with the cord of your choice: twine, fishing line, elastic bands…
The only difference in mounting an orchid to clay and other material, like on a cork slab, is where or not you use sphagnum moss. I’ll get to that later in the article.
I prefer to tilt the orchid a little to the side, not because of water retention in the crown, but only because I find it’s more pleasing to the eye. Nothing in nature is exactly 90°.
A small note on crown rot: most orchid growers will say that crown rot is due to the water sitting stagnantly on the crown over long periods.
That’s not all wrong, but crown rot is due to that water not evaporating fast enough, not that water touched the crown. If this were the case, every time it rained in the rainforest, the crowns of the orchid would rot.
To fix this problem, increase the airflow. Mounted orchids rarely have this problem, since they are more prone to drying out faster. Yet mounted on clay, the orchids have more access to water. You’ll find out they can retain more of their humidity.
In all cases, clay or bark, mounted or not, to prevent crown and stem root, I use a fan on low all the time. If my orchids were outside, I wouldn’t have to worry because airflow is constant.
Choose the right orchid for the mounting on a clay pot.
Not all genera will do good on mounts, so research first. In some cases, even if the majority of the genus do well on clay, some specific species in that genus won’t. So, research well.
The only orchids you’ll definitely want to avoid when mounting are terrestrial orchids, since their potting medium is totally different. All epiphyte orchids, which grow mounted in nature, can be mounted onto clay pots.
Aerangis, Brassavola, Masdevallia, Oncidium, and Bulbopyllum are excellent candidates, and if it’s your first time mounting, I’d start with those. Phalaenopsis tend to take a longer time to attach to the clay pots, so if you want to start with a moth orchid, tie it extremely well and be patient.
Prefer cooler-growing orchids.
Orchids that prefer warmer temperatures will not do so well attached to the clay, but still can be mounted. A good way to “please both Greeks and Trojans” is to use a heating pad under the clay pot, that way the cooler growing orchid will grow better due to higher temperatures. (If you want ideas for heating pads for orchids, this article about heating pads for orchids has some tips on what to look for.)
Some cooler growing orchids include: some species of Cymbidium, most all Odontoglossum (given plenty of sphagnum moss to retain humidity), most all Miltonias, and all Dendrobiums. Those genera will do well mounted.
I’d strongly suggest Dendrobiums since they are easier to come by than other orchids.
The Difference between Terracotta and Clay
Terracotta and clay are often used interchangeably as if they meant the same thing. Clay is the material used in making the pots. Any prime material is called clay. How high you bake the clay (at what temperatures) and if it is glazed or not will then further separate the clay into subcategories, such as terracotta, porcelain, kaolin, stoneware, and others.
Terracotta is one specific condition of baking the clay, and its name came from Italian meaning “baked-earth”. Because of the iron oxide in the clay at the time of baking, terracotta gets its earthy-red color. For this tutorial, I’ll use the names interchangeably, but just know there is a difference.
When you purchase a terracotta pot, make sure it is unglazed. There should be no type of paint of waxing on the outside of the pot. Also, the outside of the pot should be rough to the touch. Don’t choose a totally smooth pot since the roots will have a harder time attaching to the surface area.
Phalaenopsis tend to be stubborn and might take up to two years to firmly attach to the clay pot. Be patient. Other orchids have a clingier attitude and will do better with the clay.One type of terracotta pot that is common for mounting is called an olla. You can also get the cheap terracotta pots at local nurseries. Sometimes they are sold in arts and crafts stores, too.
TIP: I have seen some mounts on concrete, but I won’t recommend it.
First, because I’ve never done it, so I can’t recommend something I haven’t done.
Second, I laid tile when I lived in Brazil. The cement ate the skin off my hands if I didn’t use gloves of if I worked for long hours.
All Rights Reserved I’m not sure about the exact composition, but if it did that to my hands, imagine an orchid’s roots!
I know dry concrete is different than wet cement, but I just can’t get myself to mount an orchid on a concrete slab. Maybe there’s nothing to it and it’s just me…
How to Use an Olla Pot for Mounting Orchids
Ollas have been used for a long time as a method of crop irrigation. The pot was literally planted in the ground alongside the vegetable crop to where only the clay spout would appear above ground. Then it was filled with water. The porous nature of the pot would allow droplets to pass through the vase and irrigate the soil from underground, maintaining the soil always damp.
This method was used in climates that have an irregular dry/rain routine, where the dry parts would be too dry for moisture-loving plants. When it rained, the water was collected naturally and held for a longer period.
By filling the olla only when needed, the soil was always perfectly moist. The water held well within the olla, not oozing out all at once since the porosity was suitable for perfect osmosis.
Mounting orchids on the outside of ollas create an antique look that bears on mythical, abandoned garden feel. Moss and algae will inevitably grow on the outside of the olla due to high humidity and great growing conditions.
Moss and lime is not bad, and you can read why in this article about green algae in the orchid pot. The olla already invites you to think of the wine presses in Italy and the long, loaf bread of abandoned Greece. These would look massive in an antique Roman Vivarium. Anyway… I digress.
To use an olla for mounting orchids, don’t fertilize the water. Instead, use a misting spray and mist the fertilizer on the roots. Misting the leaves is no advantage since most orchid leaves have a waxy coating that is hydrophobic, repelling water. If you use fertilizer inside the olla, salt buildup will be inevitable and burn the orchid roots over time.
The pros of using an olla pot are many, the main one is that the watering cycle is diminished. You water once and keep an eye on your jug. The orchid stays hydrated and cool, growing as it would in nature. Provided adequate lighting, you don’t have to add any additional components.
There is no need to transport the orchid to the sink or bathtub since the jug stays in one place only.
The advantages of being stationary, fixed, and immobile are too numerous to mention. I’ve bumped so many orchids off my shelf that I wondered how I ever managed to make it.
For this mount, I envisioned walking on the beach and finding a clay pot washed up on the beach. I’ll later add sphagnum moss to the shells so it mimics seaweed (and increases humidity), and tie the two orchids in place. It’s still a mount in process. I’ll superglue the shells together so they don’t wobble. So far, I have 2 orchids in this picture, but am more for using odd numbers. Most likely I’ll add another by the time I’m done.
They’ll be tied to the outside of the pot with twine.
Deviate from the Norm when Mounting Orchids on Clay
Why use a perfectly good clay pot? Broken pots make absolutely fascinating mounts. They bring more to the eye, as they silently add a backstory to mounting.
Another idea is to superglue two clay pots together, one on top the other, open edges glued together in the middle.
A clay pole is another idea that makes mounting so much more fun. The difference between this mount is that there are holes so you won’t be adding water in the middle, but the long cylinder adds so much more to the eye.
If you need some ideas to be inspired, on Pinterest I gathered several pictures of mounted orchids on clay and terracotta. My terracotta pot is still soaking the a bucket of water at the time I wrote this tutorial, but when I finish my mount, I’ll post pictures of it. By the way, it would mean a lot to me if you followed Orchideria on Instagram and Pinterst, too. 🙂
Here’s a quick inspirational preview.
Orchideria Cultivating Orchids & Crafting TerrariumsMounting Orchids on Clay or TerracottaFollow On
The Cons of a Terracotta or Clay Mount for Orchids
In the winter, terracotta pots have a horrible tendency to crack and break. For some reason, they are fragile during the colder months. I’m still researching why this is and as of yet, haven’t found an answer. If you don’t move your pot and keep it stationary, you should be good. If you are constantly moving it to the sink and back, take precautions.
Some clay pots are made with better materials. Others, unfortunately, will not be suitable for your orchid project. To know if your pot is good quality, first fill it up with water. It the water seeps out all over the carpet, well… bad news. Leave the water in for three days. If there are no water stains on the furniture below it, you’re good to go.
The next step is to soak your pot for a week in water prior to mounting. Yes, I know… Time-consuming. This is to prevent the mount from dehydrating your orchid since it will want to absorb any surrounding water in the atmosphere. Once your pot has absorbed all the water it needs, you are good to go.
Needless to say, mounting with superglue does come hard with a moist clay pot. By the way, this article about superglue and mounting orchids does come in handy at this point. Not all superglues are the same and some will damage the orchid’s roots. So read that if you’re still going to use superglue on clay.
I haven’t been successful with superglue and clay. This is why you’ll need to attach twine, string, fishing wire, or any other sturdy wire that keeps the orchid roots in place. Twine is my preferred since it will decompose in a few years anyway.
How To Mount an Orchid to Your Clay Pot
Finally, the instructions on how to mount your orchid on a clay pot.
Rule one: Be creative. Rule two: You’re done.
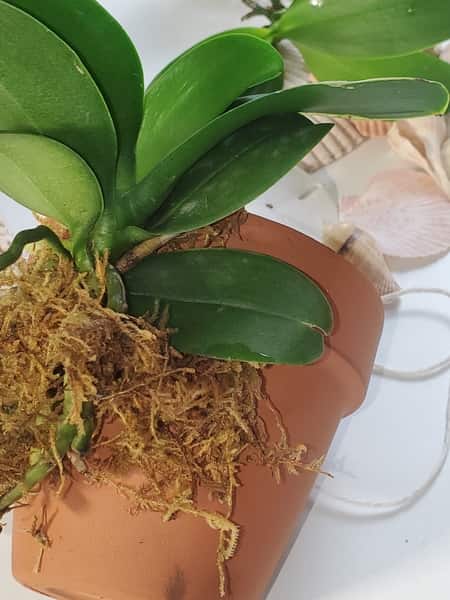
This does make for a lousy instruction guide, but there really are no rules. The only item you’ll need to decide on is the use of sphagnum moss. You will have to look at your environment and chose whether or not sphagnum moss will be beneficial.
Method 1: Mount the orchid directly to the pot. Place sphagnum over the roots. Then, tie firmly. I never use sphagnum under the roots since it takes longer to attach to the clay pot. But I keep my home office quite dry, so I need the sphagnum. If you have a solarium or greenhouse, you might not need any sphagnum at all.
If you have a central heating unit or air conditioner, I highly recommend using sphagnum moss either over or under the roots (or both). The pot will dry out even more with those on year-round and the extra sphagnum moss will retain more humidity.
Method 2: Place sphagnum on the pot in a light coating, almost as if you were trying to spare the last moss in your supply and stretch it out over the pot. Use less than more. Place the orchid, and tie. This method is best for environments that have good humidity and you aren’t using an olla pot as a jug, just a normal terracotta pot.
Test, try, and experiment. Turn your orchid sideways. Mount it upside down. Break the pot in half and use the broken pieces as art. Try different angles and see what is best for your environment.
Again, if using an olla pot filled with water, you’ll probably not need sphagnum. If the quality of your pot is not that good, you might have a saturated, overly damp clay pot, that maintains the roots too wet. On the other hand, I’ve seen clay pots that suck the very last inch of moisture out of the orchid’s roots and it still wasn’t satisfied. So, test your pots long before you ever mount your orchid on one.
Don’t Stop Learning!
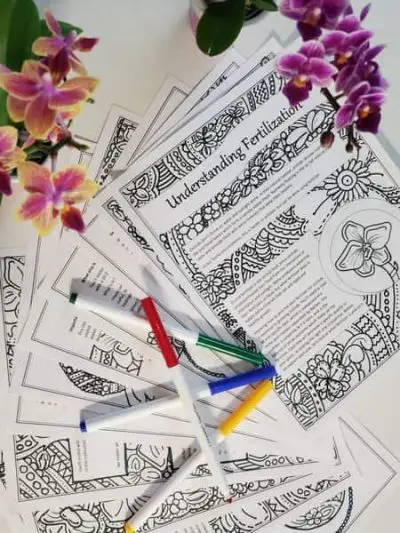
If you want to be included in more information and get a 14-page fertilization guide, please sign up for my newsletter. I don’t spam, but send emails out bi-monthly with some curious topics of interest. If you want more information, click here to go to a specific page on this website where I explain it more in detail.
Also, if you are looking for an orchid journal to keep your notes specifically about orchid care, check out my 2 solutions for that on this page. If note-keeping isn’t your thing, then there is a free excel spreadsheet that you can download. Click here for more information on how to do that.
If you subscribe to my newsletter, I will send you a 14-page guide on the main tips of orchid fertilizer. It is downloadable and you can print it out on your computer. I designed the guide to double up as a coloring book, just to make it fun.
Further Reading Suggestions:
Don’t just take my word for what is written here. Continue researching other articles about orchids mounted on clay pots, because everyone has a different point of view and unique techniques that work for them. Here is another article if you’d like to continue your research.
Read more about ollas in this article How To Use Olla Irrigation written by Melissa Kruse-Peeples (an education program coordinator at Native Seeds/SEARCH). It talks about the different types of ollas and how to choose the best one for your purposes. It goes into a lot more depth than I ever did in my article, but its focus is more on gardening and crop growing than orchid mounting. Yet the information is extremely relevant to better understand how ollas work.
Happy Cultivating!
