
I used to grow orchids outdoors when I lived overseas in Brazil, but now that I currently live in Kansas, USA, I had to re-adapt what I knew (which was close to nothing really) to set up an orchid space inside my home. Kansas is known for its unpredictable tornadoes, incredibly hot summers, and winter temperatures that drop below zero. For a few months out of the year, it’s nice outside.
Since I don’t like to carry all my pots outside, then inside again every other month, I have to grow my orchids indoors. In this post, I will go over what I have set up for my home office and how you can adapt that to meet your needs and growing conditions.
To set up a grow space for indoor orchids, you’ll need to provide lighting for 12 -16 hours a day (be it artificial or not), sufficient humidity that is above 40% most of the time, ample air movement such as an overhead fan circulating on low speed, and a way to catch drips such as a pan or pebble tray.
Let’s look at those, one by one, and see how they can be adapted to your growing conditions.
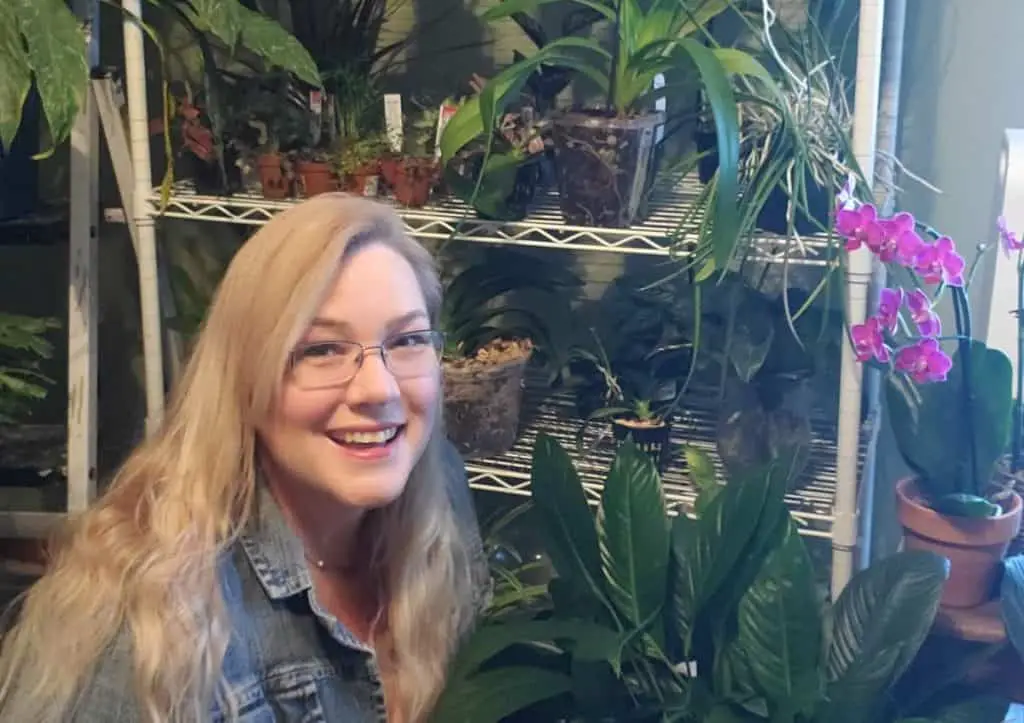
Image Credit: © 2020 Orchideria. All Rights Reserved.
My indoor orchid setup in my home office.
Orchid Setup: Location by Light Requirements
The number one item in your home to look for is light. You’ll first need to check out all the windows in your home. See what kind of lighting they provide since the window sill is the first best place to keep your orchids.
Test the windows that receive a few hours of morning sun, but no afternoon rays—east-facing windows are the best. If your morning sun is adequate and cool rays of sun are reaching the leaves, you have found the best place.
I found out that my days are extremely short during the winter and there is no light that actually reaches the leaves during the summer. Verify the outside conditions, too, such as my overhang on the roof is too long and with the tree right out front, rays are blocked out. If you are in a part of the world that has seasonal variation, think about how this place will suit you both in winter and in summer.
The best windows are bay windows, amplifying the light possibilities during the day. If you are in the northern hemisphere, then south-facing windows will receive the most light, almost too much for medium to low light orchids such as Phalaenopsis. It also does get quite hot. I’ll get to temperature later on in this article.
Where not to place your orchids
I don’t suggest kitchen orchids for a couple of reasons, mainly because of the temperature fluctuations with the stove heat and cool refrigerator simultaneously. These temperatures fluctuate highly during the day and orchids prefer a more constant place to thrive.
Besides the temperature, there are humidity fluctuations, which are also high. If those two weren’t enough, there is also the chemical release of certain fruits, such as ripening bananas, that cause extreme bud blast.
You can read more about bananas and ethylene gas in this article.
The bathroom is another place that people like to place their orchids, but I don’t recommend that.
Even though both fashion magazines and interior design magazines will have luscious orchids in the bathroom, with elegant photos of long pendulous orchids thriving in the corner, this doesn’t happen in real life.
I’ve read of people who grow orchids in their shower, due to the high humidity, but my bathroom is not that bright. I don’t have a skylight or ample windows over a tub (I’m adding this to my dream wish list…) which makes my bathroom only bright when someone turns on the lights.
With two adolescents who take extremely long showers, my bathroom does stay light and humid quite often, only to drop back down to zero humidity and literally zero fc (foot candles) when no one is using the space. You can read more about bathroom orchids in this article.
I went around my house and measured every room in terms of natural sunlight and to my utter dismay, none of my rooms had adequate lighting. This is both good and bad news. The bad first—I’ll have to buy some equipment to provide lighting. The good news—I can grow orchids anywhere I want.
If you have a window that meets the morning sun requirements, the chart below will help you display what orchids will thrive there. Usually, these are the orchids in the medium (2,000 to 3,000 fc) to low light (1,300 to 2,000 fc) and intermediate temperatures.
Medium to Low Light Orchids
Phalaenopsis
Betilia
Bulbophyllum
Calanthe
Coelogyne
Dednrobium (not all)
Dendrochilum
Dryadela
Encyclia
Epidendrum
Maxillaria (not all)
Paphiopedilums
Pleurothalis
Restrepia
Sacrochilus
Sigmatostalix
A good way to see if your orchid is a high light orchid is to look at the leaves. Very high light requirement orchids will have thick, sturdy, straighter leaves, (less flexible), and the lesser light requirements they have, the thinner, floppier, broader, paper-like leaves they’ll display.
Artificial Light To Supplement the Orchid Setup
For most all other orchids, especially bright to full sun orchids as Cattleyas, you will need a grow light.
Always check with your vendor about the light conditions for your orchid. Some of these genera are huge (as the Dendrobiums) and even though one species might be low to medium, others might be bright light.
To set up your lights adequately, first read this article I wrote about artificial light requirements (LINK). There are so many options that you literally can find one that fits your budget and has resources.
For me, I knew I needed a light so I bought one based on budget. Later, the company EK Ennoking sent me one to review, and this one out (Affiliate Link)  was delivered to me.
I was very surprised, and it not only was cheaper than the one I had previously bought but also came with a remote control and dimmer. For the cheap price, I was extremely pleased that they found me.
I highly recommend their lights—if they were bad, I would be straightforward about it too. I gain nothing in mentioning a product that wouldn’t benefit you.
If you go with the fluorescent light setup, you can either pick up 50/50 warm and cool lights, or the more expensive solution is to buy full-spectrum lights. This will depend on your budget, but both work extremely well. One thing to take into consideration is that you’ll have to buy one light setup if it’s the high-intensity discharge light, like mine, or buy three or four light setups of the fluorescent lights.
For the high-intensity discharge lights, you’ll need to take note of the watts. For a setup that uses 1000 W, the coverage will be 12 x 12 foot space (3.5 x 3.5 m), and you’ll need to set it up 5 to 7 feet (1.5 to 2 m) above your shelves.
For a 400 W light, you can move it closer to your orchids, from 3 to 5 feet (1 to 1.5 m) above them. The coverage will decrease, providing ample light in an area of 8 x 8 feet (2.5 x 2.5 m).
For less powerful lights, using 250 W, you’ll need to be fairly close, from 1 to 3 feet (0.3 to 1 m) above your orchids, and the space that they cover is considerably less—5 by 5 feet (1.5 x 1.5 m).
| Watts | Height Above Orchids | Area it Reaches |
| 1000 W | 5 to 7 feet (1.5 to 2 m) | 12 by 12 feet (3.5 x 3.5 m) |
| 500 W | 3 to 5 feet (1 to 1.5 m) | 8 by 8 feet (2.5 x 2.5 m) |
| 250 W | 1 to 3 feet (0.3 to 1m) | 5 by 5feet (1.5 x 1.5 m). |
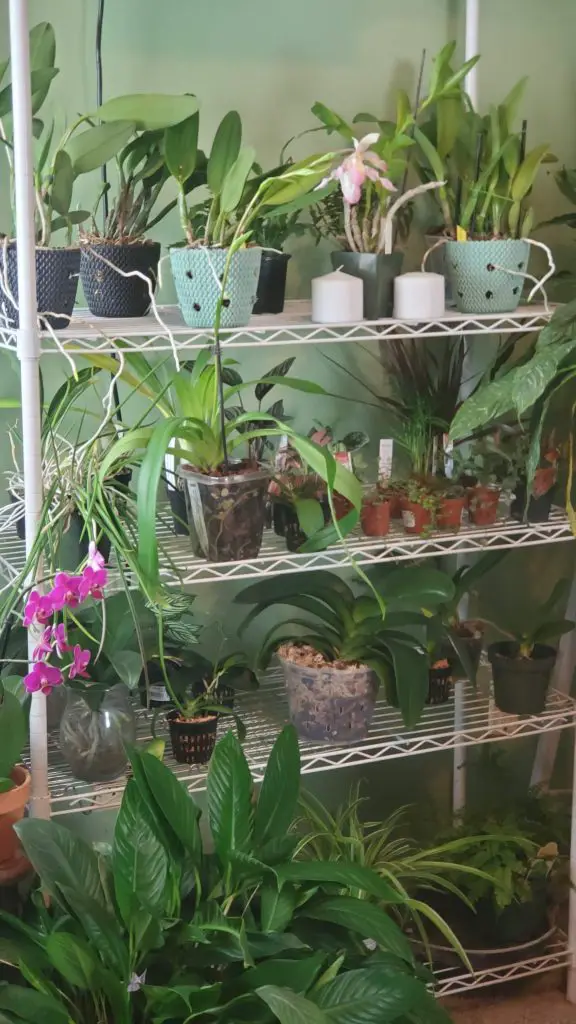
Shelving for Your Indoor Orchid Setup
I bought a wire rack (shelving unit) to keep my orchids indoors. Its an everyday, non-remarkable model at the construction store because it doesn’t have to be fancy. Any model will do.
You can adjust the height in between the shelves and it comes with a plastic covering that prevents rust. You’ll either be misting or watering constantly, and that is one requirement that I wouldn’t let up on.
You might be thinking that shelves are a little much, but once you really start this orchid hobby, you’ll see that it becomes an addiction quickly. One or two orchids quickly become seven or eight, and pretty soon, you have more than 50 the first year.
I noticed I was addicted when I’d go grocery shopping, and they’d pop into my shopping cart without my knowledge. These orchids are classified as jumpers.
In any case, you’ll need a shelving unit that is easy to adjust the height and space of your orchid collection. Most of my orchids are thriving under this setup, but some I’m still having to find adequate space.
My Catasetums this year have grown immensely tall and the top leaves are touching the lights. One got sunburned from direct contact before I realized that, and have to readjust the shelves’ height. With a fixed model, this was impossible.
Also, my Cymbidiums are extremely tall and they seem to pose a problem with their leaves. I don’t have a nun orchid yet (Phaius) but I plan to get one, and when I do, I’ll have to change that orchid setup completely.
This is why it’s best to find a shelving until that is adjustable with time because your orchids will be moving from here to there until you find the perfect place for them.
Image Credit: © 2020 Orchideria. All Rights Reserved.
Humidifiers for your indoor Orchid Setup
Besides light, the second largest problem of growing orchids indoors is the high humidity. Most orchids start at relative humidity levels above 40% and indoor space is usually 33% or lower. I wrote an article about humidity, so I won’t repeat it all again, but you can read that here.
With the constant use of the air conditioner or central heating unit, my home office sits at around 30%. A humidifier is the best solution for growing orchids indoors in a setup that is optimal for their growth. In this article, I go over the many kinds of humidifiers on the market and explain which one I chose for my home office. That model has since gone out of business, but I recommend this one. (Affiliate link)
If your environment has a higher humidity level, then you won’t need a humidifier. A good way to notice is the aerial roots on your Phalaenopsis orchids. If they are crumbling and dying too soon, this is a good sign you need a humidifier, even if it is only on a couple of hours a day.

I can’t use a bigger humidifier because my computer and camera equipment is in my home office.
How to Place your Orchids on the Shelves
Now that you are setup, it’s time to place your orchids on the shelves. There are two possible ways that this can be done, depending on the lights you purchased above. I’ll go over both ways.
The first one is if you purchased a light like mine that literally comes with sunglasses because it’s so bright. It’s a huge source of light, and I like to call it a mini-sun. In this case, you will place all the high light orchids, such as Cattleya and Brassavola, on the first shelf, closest to the light source.
On the second shelf (the lower or middle shelf) you’ll place all the medium light orchids, such as Dendrobium and Phalaenopsis orchids.
On the very bottom shelf, you’ll have your low-light orchids, almost the shade orchids, such as Draculas and Masdevallias. They will get direct rays, but they are so far away from the orchids that this won’t be a problem.
In the second case scenario, you’ll have two fluorescent lights on each shelf or every other shelf. To make this work, set up your orchids with the highest light requirements directly under the lights. Once those are complete, set up the lower light orchids to the very back of the shelf and on the outer ends of the lights.
I prefer to have every other shelf in this case because even at the end of the shelf, I find the light to be too much. On the second shelf, with the fluorescent lights, they work better and still get enough light. If you can, try to find dimmable lights or lights that you can control the settings.
This is more costly but works better than the first solution. Of course, this won’t work if you have solid shelving units, such as wood or solid metal shelves. They need to be see-through.
Orchid Setup That Is Water-Resistant
One thing that you need to keep in mind when creating your orchid setup is to supply water. In my home office, my floors are carpet. Any drips are absorbed, but if it’s watering where you need to see the water drip out under the pot to guarantee good watering, then this is a huge problem.
There are two ways to solve this. I went with the cheaper option, and have Tupperware storage containers on the very bottom shelf. Nobody sees them anyway, so I don’t mind. This solution works but it does imply that your orchids will trickle down on each other from the top shelf all the way down to the bottom shelf.
If you are 100% positive that your orchids are healthy, then this is a great way to water because you don’t have to move them to the sink and back to the shelf again. Orchids hate to be moved.
The next way is to place trays, such as humidity trays like this one (Affiliate Link) under the pots. I find these humidity trays are a pain in the underside when used as humidity trays, and I wrote this article explaining why (link).
Yet as a drip catcher, they are perfect. I don’t add any rocks, just the trays themselves and empty them once they become too full. Usually, that’s after every watering.
I just wish they weren’t so expensive, and I’d use them more. There is the downside that these trays are not see-through or clear, and they don’t let the light trickle down to the next shelf, which is why they aren’t my preferred method.
Orchid Setups Always Provide Air Circulation
One of the biggest problems in orchid care is root rot followed by crown rot. The black spots on the leaves form when you mist or water your orchid and droplets land on the leaves.
In nature, these droplets would evaporate and return to the air, raising the relative humidity around them. Yet inside our home environment, this doesn’t happen as quickly.
Overhead fans are essential to keep the orchid’s leaves dry and free from potential bacteria. Air circulation also provides that the roots will dry out in their medium as they would with the natural wind currents flowing through the forests.
During the winter months, you’ll want to push the warm air down and for the summer months, change the directions to pull the cool air up.
Winter – push warm air down
Summer – pull cool air upIf you don’t have an overhead fan, you can purchase overhead fans that keep the air circulating most all times during the day.
If you have a solo orchid sitting out on the living room table, this won’t be necessary. The free space around it is adequate enough to allow the roots to dry out naturally. This detail is only fulfilled if you have a home environment of low humidity, around 30 %.
Temperatures on Indoor Orchid Setups
My home office is extremely hot during summer, getting up to 82 F (27 C) best it gets the setting sun in the west all afternoon long. My electric bill is a tad bit high due to the constant air conditioner, but some of my orchids really like these insufferably high temperatures.
For my cool growing orchids, I had to set up an orchid terrarium, where the temperatures are cooler than in my home office. I also placed that terrarium in my bedroom, which gets no sun whatsoever. But with the no sun comes no heat, and they are thriving there.
When you purchase your orchids, you’ll want to take note of what the temperature ranges are, and what best is suited for your orchids. Orchids will be categorized into three temperatures, cool, intermediate, and warm.
The temperatures that will come classified on these orchids are how low these orchids can reach and still thrive. They are not averages; they are minimums. This also means that these temperatures are given during the winter months, and should not be calculated during summer.
Cool 45 to 55 F (7 to 12 C)
Intermediate 55 to 60 ( 12 to 15 C)
Warm 65 F or higher (18 C or higher)As you have imagined, my home isn’t very well insulated. That’s why it gets so hot in summer, but it also gets cool in winter. I lost a whole bunch of cattleya orchids my first winter in my house because I didn’t know it got so cold. Needless to say, I bought a portable heater and set it up at night to keep the indoor temperatures stable all year round.
On the other side of the temperature spectrum, there are cool-growing orchids that can’t stand higher temperatures, such as Masdevallias and Dracula orchids. For these, I bought a cool-mist evaporative humidifier, that both raises the humidity but also blows out cold air. It was used for a small orchid terrarium and not a whole bedroom or larger space, so that option worked out fine.
My suggestion is to go around your house and verify how hot or cold it gets in each space. You can write that down in this excel spreadsheet (LINK). This is a good way to verify your conditions in each space, and supplement the spaces that aren’t so superb with either lights, humidifiers, heaters, water trays, humidity trays, or other apparatus that you’ll need to keep your orchid happy.
Well, that’s how I keep my orchids. If you have any other ideas of how to keep your orchids, then please comment below. If you have any questions, other than greenhouse questions (because I know nothing about greenhouses) then please get in touch.
Don’t Stop Learning!
If you want to be included in more information and get a 14-page fertilization guide, please sign up for my newsletter. I don’t spam, but send emails out bi-monthly with some curious topics of interest. If you want more information, click here to go to a specific page on this website where I explain it more in detail.

Also, if you are looking for an orchid journal to keep your notes specifically about orchid care, check out my 2 solutions for that on this page. If note-keeping isn’t your thing, then there is a free excel spreadsheet that you can download. Click here for more information on how to do that.
If you subscribe to my newsletter, I will send you a 14-page guide on the main tips of orchid fertilizer. It is downloadable and you can print it out on your computer. I designed the guide to double up as a coloring book, just to make it fun.
In all, I wish you the best in your orchid care.
Happy cultivating.

Hi Amanda, thanks for your very informative videos. I want to set up a better artificial lighting situation for my orchids and was curious about one thing in your setup? Do you just have one unit above your shelving? Looks like you have a thick number of plants on the next shelf down and then the bottom one. Seems like the plants very much shade the ones below them. I don’t see how those lower shelf plants get enough light, also when you realize they are further away. I would love such a system to work for me if possible. Thanks for what you do to encounter love and care for these amazing plants!
Hi Coral,
Yes, you’re right. I only have one light above my plants. I can do that because I have a side window that brings in tons of natural light (no direct sun) so the bottom ones only get partially shades. That being said, I place my Cattleya orchids closer to the light on the top shelves, and the phals (if I can) and other light-sensitive orchids on the lower shelves. Most people place 2 lights so they can grow more of what they like.
-Amanda