
Occasionally when you repot, you’ll pull out what seemed like a healthy orchid out only to find it has no roots—not one.
How do you save an orchid with no roots? There’s hope to rescuing this rootless orchid, using a method called the Sphag and Bag Technique, (or called the sphag-n-bag) and help it grow new roots. But first, you have to know what caused the roots to fall off in the first place.With no roots, orchids are also slowly dehydrating and will die if not treated. Sphag and Bag Method prolongs the time an orchid has before dying, enough to hopefully grow a new root.
The aim of the Sphag-n-bag Method is to raise the humidity around the leaves so they will absorb water in the newly created micro-atmosphere. With enough water, an orchid with no roots will eventually create new roots.
Why Does Root Rot Occur?
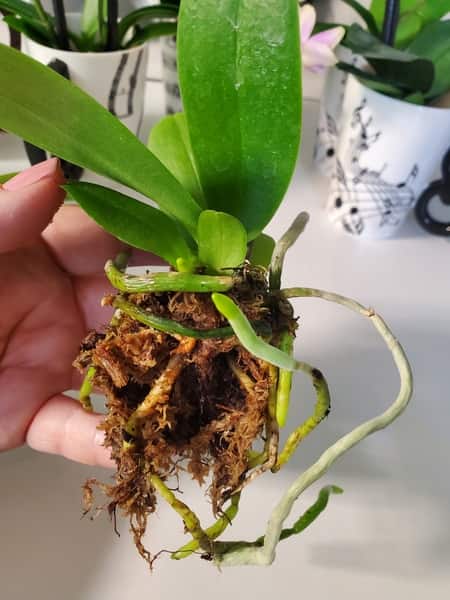
Image Credit: Orchideria 2019-2022
Roots fall off for many reasons, but mainly because of over watering.
Technically, water is not the culprit, but it’s the first domino to knock down a long line in the process, leading to root rot.
Think about how an orchid grows in nature, clenched to a tree nook, with areal roots both grasping the bark and roaming in the wind currents. The natural habitat is usually one with very high in humidity, with filtered light from the overhead leaves, limbs, and flowers above them, and high temperatures. (Take note of those three highlighted items. They’ll be important later on.) It rains almost every day or every other day for about an hour or two, then the wind dries out the roots.
To create this similar process at home and indoors, we pot our orchids in a potting medium that allows air to circulate freely through the root system. This is why hanging baskets and mounted orchids are very similar to the original conditions of the plant.
Root rot occurs when trapped water can’t escape through the exits in the potting medium. The roots sit in a drenched pot, which is constantly in contact with the roots. When water can’t exit the pot, it reacts with the medium it has near it, deteriorating it. Sphagnum moss, peat moss, bark, and to some lesser point, charcoal all will deteriorate quickly if they are in constant contact with water.
When the potting medium deteriorates, it breaks down in to smaller pieces that limit the air flow and also compact the medium inside the pot. Without air flow, the roots can’t expel the oxygen inside them and trade it for carbon dioxide. The oxygen then builds up inside the root, which becomes toxic to the plant.
Once the orchid notices the high levels of oxygen, it will liberate a chemical reaction to reduce the oxygen levels. This is a positive reaction which does eliminate the oxygen, but destroys the root cells in the process. In order to save the plant, the roots are sacrificed. This is why over watering is no the real problem, but the open door that leads to root rot.
What are Early Signs of Root Rot?
If the orchid has lost all it’s roots, the leaves will slowly dehydrate.
Loose, limply leaves with deep veins are the first sign. They can’t absorb water through roots, because there are none.
The leaves start to lose their firmness and can easily bend between your fingers.
How to Save an Orchid with no Roots with the Sphag and Bag Method?
The way to save an orchid with no roots, be it from root rot or not, is to encourage new root growth.
This method isn’t considered an active method to save your orchid, but just to stall dehydration so it can have enough time to grow roots. An orchid loses water through the leaves (pores in the leaf structure called stomata) when the exchange gas.
Yet, if you reverse that, and make the environment more humid than the inside of the leaf, the humidity will enter the leaf cells during air exchange. You can have such a high concentration of relative humidity (rH) that the leaves absorb water during that process. While they absorb water, they lengthen the time of survival, enough to grow a new root.
Think of the Sphag and Bag Method as one that stall the dehydration process long enough for your orchid to grow new roots.
How Long will the Sphag and Bag Method Take?
This slow hydration method will be sufficient to grow new leaves, but this is a long, struggle, so don’t except results to be quick. We are looking at a minimum of one month for the first root, and two months for a few more roots.
Why does Sphag-n-Bag Method work so well with orchids that have no roots?
Since the orchid will breathe through its leaves, you can raise the humidity level to near 100% around the leaves. This is nearly impossible without a greenhouse, but is fairly easy with the Sphag and Bag Technique.
The humidity will be trapped inside the bag and force the leaves to absorb more than they would naturally. The extra humidity will hydrate the existing leaves back to health and still have enough nutrients in orchid to create new roots.
Step-by-Step Method of Sphag-n-Bag:
1)Take the orchid out of its old pot and remove all older potting medium. Medium will be clinging to the roots, if it has any roots at all. Clean it as well as you can.2)With sterilized scissors, trim away all the dead material. All of it. You don’t want any old, decayed, rotted material in your bag since this will cause mold. 3)This step is optional, but if you have the materials, it might be worth the try. Soak your orchid in one teaspoon per gallon of a root enhancer for an hour.
Look for root enhancers, stimulants, hormones, or a fertilizer that promotes root growth. Just dilute it a lot. KelpMAx, Dyna-Gro K-L-N Rooting Concentrate, or SuperThrive will all work fairly well, but don’t expect miracles. If you don’t have these products, no harm done either. 4)After the soak in warm water, continue to remove any debris that is still attached to the orchid. It is essential that all the potting medium come off. 5)Use a long, clear bag or a Ziploc bag and placed some humid sphagnum moss in the end. You can find these at flower shops and nurseries, but if your orchid is small, a bread bag works well, too.
Arrange your bag so that it can accommodate both the sphagnum and the orchid in different spaces. You can use two pots, or one pot inside another pot, or keep the orchid on a higher level and the moss hanging off a shelf… Anyway, that works for you. 6)Soak your sphagnum in water for at least thirty minutes. Fresh sphagnum right out of the bag doesn’t retain humidity well at all. In fact, it will end up soaking up any of the humidity that was meant for your orchid.
Once the sphagnum moss has had time to soak, squeeze out the excess water. Don’t place drenched sphagnum moss in your bag, and don’t substitute this for peat moss. It has to be sphagnum moss.
If you don’t have that, you can use a damp paper towel, but it will get icky toward the end of the month.
To know if your moss is the right humidity, give it a tight squeeze. It should drip, but not a lot. 7)Place your orchid on the other side of the bag. Don’t let the orchid touch the sphagnum or the water. You might even want to place it in a plastic cup with more holes than sides to it, just o keep the water off and away from it.
This is where most people error with the Sphag and Bag Method. The orchid touches the edges of the water and this promotes more root rot. With no roots, the water will seep into the crown, leaves, and stem, and after a week, you’ll have a rotting orchid for sure. 8)You don’t need to Ziploc the bag shut, but you do need to minimize the air exit. Position the bag over your orchid so it has enough room to keep maximum humidity and a small air hole to promote some circulation inside the bag.9)Place your orchid in a place that meets these three conditions: (1) low light, (2) high heat, (3) in high humidity where it can be left undisturbed for weeks.
Remeber the three items I asked you not to forget at the beginning of the article? Here they appear again. We are going to recreate these three items with the Sphag-n-bag Method.
Low, filtered light because if this bag gets direct sun, it will transform the micro-environment into a sauna. You don’t want to create a terrarium, or a micro-tropical-climate inside the bag, just raise humidity.
Light will promote growth that is uncalled for, like microorganisms of all kinds. The light also interferes with the leaf growth, stimulating it. You don’t need new leaves. The aim is new roots. Less light induces root production.
Light also quickly breaks down a chemical compound (hormone) called auxin, which is the base of your hormone treatments. If you added hormone treatment to your sphagnum moss, then you’ll definitely want to keep it in the shade.
The high heat will speed up the metabolization in the plant, and new growth can occur faster than in colder climates.
Note: If you used synthetic root hormones, then cooler climates will enhance their production more than higher temperatures will. In fact, the higher temperatures will break down their chemical reaction faster, so it will be wasted money. So invert the last tip.
10)Leave your orchid in a forgotten place and forget about it.
Orchid hate to be manipulated, as in handled (not lied too.) Sorry, I had to throw that joke in there.
Anyway, the less you pull out the bag, inspect them, turn them in different angles, move them inside the pot, the more they will appreciate the time alone to regather their thoughts.
They can calmly work on root production without wondering why their environment is being turned, squished, moved, and changed. 11)If your bag has a wider opening at the top, then you’ll need to mist the sphagnum every once in a while. If the opening is rather small and the sphagnum looks well hydrated, then you’re all set.
If you zipped your bag totally shut, then you’ll probably have a mold collection and a dead orchid.
The only way to not get mold is to add springtails, which are kind of cute little critters that we place in terrariums. They eat the mold and keep the terrarium clean on the inside, permitting the enclosure to stay completely sealed for months. But honestly, you don’t want those in a bag, so let’s just focus on the air circulation, and not a terrarium.
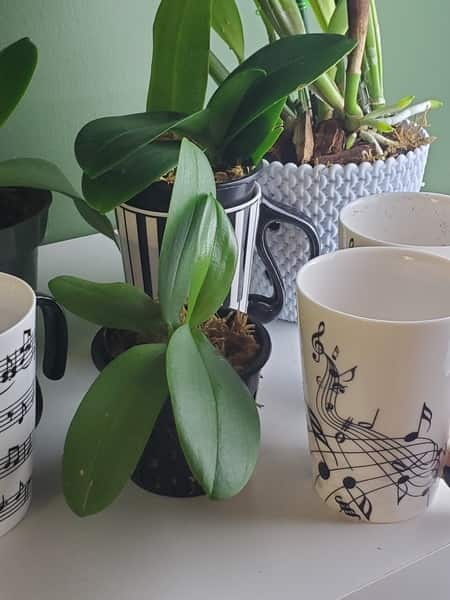
After one month, check up on your orchid. There should be at least one new root sprouting from the stem.
Don’t Stop Learning!
If you want to be included in more information and get a 14-page fertilization guide, please sign up for my newsletter. I don’t spam, but send emails out bi-monthly with some curious topics of interest. If you want more information, click here to go to a specific page on this website where I explain it more in detail.
Also, if you are looking for an orchid journal to keep your notes specifically about orchid care, check out my 2 solutions for that on this page. If note-keeping isn’t your thing, then there is a free excel spreadsheet that you can download. Click here for more information on how to do that.
If you subscribe to my newsletter, I will send you a 14-page guide on the main tips of orchid fertilizer. It is downloadable and you can print it out on your computer. I designed the guide to double up as a coloring book, just to make it fun.
When NOT to use the Sphag and Bag Technique?
If your orchid has two good roots, or even one long excellent root, don’t follow this method. That one good rot is enough to raise the percentage of water in your plant.
I’d try full hydroponic method or a semi-hydroponic method directly. That one or two roots will be sufficient to absorb and nutrients and minerals for your plant and the Sphag and Bag Method might hurt them in the long run.
What the best thing to do for few roots is to go semi-hydroponic and place a bag over the entire pot. This way the humidity will be high enough to keep the orchid safe until new roots and new leaves grow.
I hope this tutorial on the Sphag and Bag Method is a step in the right direction of saving your orchid. It’s always worth a try, but if the roots have been gone for a long time and the leaves are severely dehydrated, even this method might not work to save your orchid.
I mentioned in this article about hydroponics and semi-hydroponics. If this is something you’d might try, read this article. If you think your orchid is on its last leg (or leaf) then this article about orchid’s life cycle might explain more what to expect and how long your orchid has to live.
Please leave a comment below if you have used the Sphag-n-bag method or if there is anything that you think I should mention in this tutorial that I happened to leave out.
Happy Cultivating!

Hi Amanda,
I am Jean Rogers, President and Newsletter Author for the Orchid Society of Greater Kansas City. We recently had a speaker on Sphagnum Moss and we had members asking about how to save an orchid with no roots. So, I went researching and found your article. I’m asking permission to reprint it, of course giving full credit to you and Orchideria. I had not heard of you before but am anxious to click your link and see what other articles you have!! Thank you so much, it is a great article!!
Jean Rogers
P.S. I was pleased at your Bio. and also ads – I use Lifeboost coffee and Purty Woods face products.
Hi Jean,
Absolutely! I would be honored. You made my day!
-Amanda
Hi Amanda, i have a question. Can i use Sphag&Bag Method on baby orchids (i have 2 siblings) without the roots yet, still attached on the stem? Mother orchid just died, her last leaf just turned yellow. Unfortunately i wasn’t successful to save her! If i can apply this method on babies, do i have to cut them off the stem they are still attached to? I don’t want to lose them! I’ll appreciate any help! Thank you! Bozena
I tried this method exactly as you said – humid sphagnum moss, slightly open ziploc bag and orchid in a plastic cup with holes not touching the water or moss and in two days the dead root tips or crown is covered in fuzzy white stuff which I’m assuming is mold. Please help! Leaves are still green but very flimsy.
I just wanted to say…for some reason my entire bottom came off my Orchid. Not a root left at the bottom! I didn’t know what to do so I made a bed of “spag” moss in a sm terracotta pot. Laid the orchid head on that. (At the bottom of pot I put “normal” orchid putting material.) I misted the spag every few days and about 3 weeks later I had a healthy little root! It made me sooo happy! Still there!
Hi I just read your article which is very interesting and helpful. Thank you very much.
I do have a question. I have been trying to save my rootless orchid by placing it over a glass of water ( not touching the water) and then in a ziplock with about 4 small holes for air flow. The bag is tightly shut.
Today I checked on it and got two surprises. I saw a new sprout of a root or a plump green thing. No sure. On the other hand, my leaves are now limpy and turning to a light green. What can have gone wrong? I think you have guessed that I am a newbie.
Thank you so much
Hi! Thank you so much for all you’re doing! Problem 911: I have been using sphag and bag method for 2 months now for a no root little phal (or one minuscule no velamen 1/2 inch root!) I soak it once a week in tea. The orchid produces many leaves but not a single root!
Should I keep on the method? Should I stop soaking in tea? Please tell me.
What if the plant really ONLY has aerial roots (lots of them). The main roots rotted off. I’ve done everything you first mentioned, and just now potted almost all aerial roots and what stem I could clean up (dipped tip in cinnamon), and planted in orchid pot in soaked overnight orchid bark. Should I used the bag on this?
Hi I’m a beginner, I need all the help I can get.
How to transplant a baby orchid that does not have roots?
How long after having roots growing using the sphag and bad method should an orchid be potted in growing media? Thank u in advance!!