
Once you get your first orchid and learn how to care for it, it’s only natural to wonder if your orchid is healthy. Is the care that you are providing for your orchid enough for it to thrive?
Several signs that indicate whether an orchid is healthy or on the verge of complete disaster, and in this article, you’ll learn what signs to look for that indicate there might be a problem with your orchid.
How do I know my orchid is healthy? Healthy Phalaenopsis orchids will have strong leaves with a lime-green color that is uniform along the full extension of the leaf. Aerial roots will be present in a healthy Phalaenopsis orchid, with thick silver-gray velamen and soft green tips. The potting medium in a healthy orchid will show signs of good air circulation and excellent drainage.
Contrary to popular belief, beautiful orchid blossoms are not indications of a healthy plant.
It might be that the orchid is producing its last cry for help to survive by reproducing its species—for that, it produces the best flower it has ever made before it dies off.
As an initial tip, this table below summarizes what a healthy and unhealthy orchids look like, but I’ll explain them in the article one by one:
| HEALTHY ORCHID | UNHEALTHY ORCHID |
Orchid leaves are firm, dense, and hold their form | The leaves are wrinkled, limp, and lifeless, hanging over the pot with no resistance |
| Leaf color is light to light to medium green, never dark green | The last (newest) leaf is dark-green or pale yellow. It’s also smaller and weaker than the previous one |
| Leaf color is the same, not spotted or washed out in specific places | Leaves are discolored, either with white tips or brown spots |
| Phalaenopsis orchids will have aerial roots that are plump, silver-white with green tips | Aerial roots are non-existent or brown, crunchy, and shriveled |
The potting medium doesn’t smell, might contain some algae, but isn’t soaking wet or bone dry | Fungus gnats are circling the potting medium |
What does an unhealthy orchid look like?
Before I actually number down the list of what a healthy orchid looks like, and signs to indicate health in a Phalaenopsis, let me just pinpoint what are obviously bad signs.
Sometimes it’s easier to start with an unhealthy orchid and describe what makes it unhealthy than to paint the perfect orchid picture. An unhealthy orchid will first manifest its condition through its leaves. When the orchid leaves look like the life is slowly being drained from them, then you have a problem.
Leaves are the main flow of gas exchange and nutrient absorption, not only the roots. When the orchid is dehydrated, the leaves will grow limp and have a hard time holding their shape.
Usually the mini Phalaenopsis you purchase at grocery stores have this characteristic. Their leaves hardly hold up to the test of time, usually because of poor maintenance from the supermarket.
The second indication of an orchid that is going to die on you (unless you have a really green thumb and know a lot on how to rescue orchids) is one that doesn’t have any roots.
Stay away from rootless orchids.
You won’t know if the orchid is healthy or not at the grocery store since the real sign is in its roots. Orchid roots are the ultimate sign that your orchid is doing well or on the verge of parting ways with this world.

When you repot, you have an overall view of how this orchid is doing—healthy or not. Orchid roots have adapted to also photosynthesize, not only absorbing water but also sunlight.
Since they are epiphytes (they grow on trees and not in potting soil) the roots have adapted to produce chlorophyll. This allows the roots to absorb the light in the environment around them, adding extra minerals to their diet.
If you can tell that either of these 2 signs are not good, you need to step up your care. If you haven’t bought this orchid yet, then kindly smile and nod as you place the orchid back on the shelf and walk on by.
13 Candid Signs That Indicate your orchid is healthy
1) Healthy, Green Leaves
The leaves on your Phalaenopsis orchid should be strong and not limp. If they bend easily, and you can flip them back and forth between your fingers, they are way too weak.
A healthy Phalaenopsis orchid will show firm resistance to being handled, and the leaves will feel like they’ll break before they bend. You can move them, but their firmness is visible.
The leaves won’t be overly plump, but they won’t be paper fine either. Leaves are where the orchid stores the biggest part of its water, and limp, thin leaves show signs that the orchid is dehydrated.
2) Silver-Green, Plump Roots
Roots should be firm to the touch. If they are mushy brown colored, then they are either naturally dying off, or they are on their way to death from root rot. The brown will rapidly turn to black and the once healthy root will now turn black and decay.
Healthy roots should be silver-white or even yellow if they are in the middle of the pot. The yellow color just indicates that they haven’t seen the sun in a long time, and the chlorophyll production is down. Move those yellow roots to the outside of the transparent pot and they’ll turn green again.
I wrote a whole article just about yellow roots you can read here, if you’re interested in whether or not to cut them.
3) Healthy, Vibrant Blossoms that Don’t Fade
Don’t judge by the flower, since blossoms are not indicators of healthy orchids. Yet, if your orchid hasn’t blossomed in the past year, there might be something wrong. A healthy orchid will blossom on a regular cycle.
If you just purchased your orchid and it hasn’t had time to adjust, then wait this one out a year. Cattleyas are especially noted for their resistance to blooming if they’ve been moved, Phalaenopsis spring back faster.
If you’ve changed potting mediums or altered the window it was living by, or changed the kind of water you used—the slightest change—your orchid will feel it. So, give it a year’s break and see what happens.
If you’ve had your orchid for more than a year and it bloomed last year but this one it didn’t—keep your eyes open. Something’s definitely wrong. If your orchid’s flowers wilt as soon as they open, check out this article, where you’ll learn to identify the problem.
Healthy flowers will not have discolorations or holes in them, which can indicate a sign of bugs. Otherwise, the flowers are no definite sign of good or poor health in an orchid.
4) Fresh Potting Medium that Allows Airflow and Good Drainage
Healthy orchids need to be repotted once every two years, and if you have a terrestrial orchid that is more sensitive to decay, like Paphiopedilums or Miltoniopsis, I’d look into yearly repots. Phalaenopsis do well with new media every two to three years.
You need to verify that your potting medium in the best suited for the kind of orchid you have. Some orchids grow better in sphagnum moss, others in perlite, others in charcoal…
Image Credit Orchideria.com 2020 All Rights Reserved
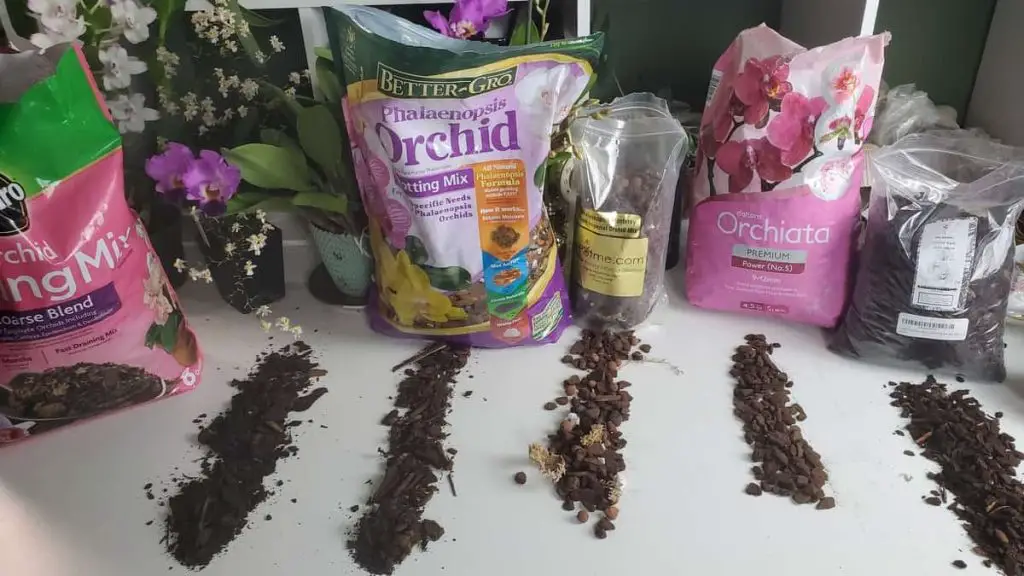
The potting media will be the biggest component in whether or not your orchid will thrive.
Does it retain too much water?
Does it dry out too quickly?
How much air circulation does it get inside the pot with that media?
A healthy orchid will have new, fresh medium that sits tightly in the pot yet still provides adequate airflow and quick water drainage.
A good sign that your potting medium is good is if a bit of algae grows inside.
You might be thinking, “What???” But in this article, I’ll tell you why it’s a good sign.
5) Healthy Orchids are Adequately Hydrated
The main reason most Phalaenopsis die is because of over-watering: both too much and too frequently. A healthy Phalaenopsis will sit in moist media, never bone dry, never sopping wet.
I recently ordered a Phalaenopsis online and the media was dripping wet, even after four days in transit.
The orchid reacted badly—and so did I.
Some of the leaves split, they withered (because over-watering can produce edema in leaves but they also can show signs of wrinkles that are confused with under-watering and dehydration) and the orchid lost some of its buds. Talk about wanting to cry…
Anyway, a healthy orchid will be able to absorb the water that is provided and not take in too much or still be wanting after water day. When you water the orchid, the water must exit quickly, providing a free-flowing environment as the orchid would have in nature. Any water that pools inside in the orchid potting medium will harm your orchid.
There is another point about water and a healthy orchid that many new orchid growers don’t take into account. That is the pH. Each orchid has a pH that they thrive in, and tap water, hard water, soft water, distilled, water and reverse osmosis water all have different pHs.
If you want to know more about that, I suggest this article about the best water and pH. Your orchid might not be healthy just because of the quality of the water you are providing to it.
6) Healthy Orchids Thrive in Humid Environments
This is such an overlooked item that makes such a difference in how orchids grow, especially indoors. When I lived in Brazil, my orchids were all outside and mother nature cared for them. I would forget about them completely and watering came naturally—it rained.
So, when I moved back to Kansas from being overseas, I had to relearn (or let me say learn for the first time) how to grow orchids. This was totally new to me, which is why I made this website. I had to research so much because my growing conditions were different.
What got me every time was the humidity.
The aerial roots on my Phalaenopsis orchids would shrivel up, so I’d water more. It wouldn’t make a difference, so I ‘d water even more. My orchid ended up with shriveled, paper-dry, aerial roots, yet soggy, black rot inside the potting media.
It took me forever to understand that what was lacking was the humidity, not water. In Brazil, I never had to think about the climate being too dry, except in the dry season. But since it was dry season, I naturally watered the grass under the palm or coconut tree and the humidity rose naturally.
Now that I keep orchids in my home office, and Kansas has only two temperatures—blazing hot or ice-cold—I have the air conditioner and heater turned on year-round. I turn those off maybe 2 weeks out of the 52.
Anyway, I had to get a humidifier. If you want to know which one I chose, this article goes through the different humidifier options that are on the market. Once I turned on the humidifier, not only could I breathe better, making a clear distinction of my overall attitude in life, the aerial roots and orchid leaves perked up.
Orchids absorb humidity in the air, and the rH in my home office was around 27%.
Phalaenopsis prefer a much higher humidity or around 50 to 70%. Healthy orchids will prefer to live in an environment with lots of humidity, and that requires a humidifier.
7) Healthy Orchids Grow Better in Bright Shade
Healthy orchids will live in the right light requirements, and that is indicated by the color in their leaves. If the orchid has purple spots on its leaves then it is too close to the light. You don’t have to move it since it has produced its very own form of sunscreen, called anthocyanins.
These purple spots don’t harm your orchid but make sure the leaf isn’t overheating. If it is still cool to the touch, your orchid is healthy.
If the leaves are dark green, your orchid is on its way to becoming unhealthy due to the lack of light.
The leaves produce chlorophyll to capture and transform any extra sunlight they possibly can, and these green cells turn the leaf dark green.
Move your orchid closer to the window or move it to a higher shelf.
A healthy orchid should have soft green leaves, like early summer colored grass.
There might be a tint of yellow it the leaves, as they lean toward the light.
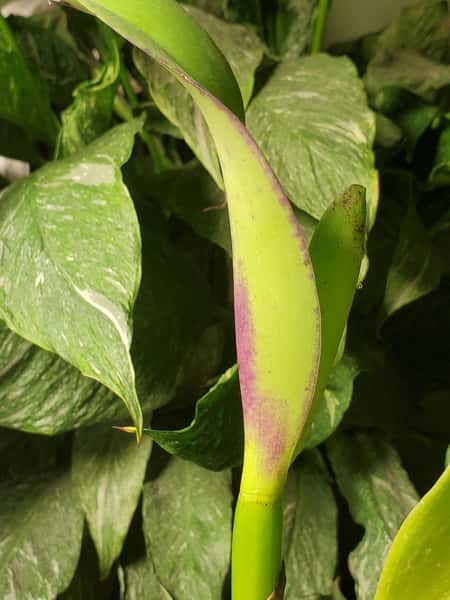
Purple Spots on Orchids
In the picture above, I placed my Cattleya too close to the light source. It didn’t burn the leaf, but the higher quantity of light made the orchid produce its own sunscreen.
8) Healthy Orchids Receive Proper Nutrients Through Fertilizers
A healthy orchid will be properly fertilized. An over-fertilized orchid will have brown tips at the end of its leaves, and yellowing leaves starting at the end of the leaves. These brown tips are accumulated nutrients that orchid can’t get rid of, causing a toxic overload in the leaf. The leaf then turns yellow and dies off from the end tip.
You can use a balanced fertilizer in small doses every week since water alone is not healthy.
9) A Healthy Orchid is Potted Tightly into Its Vase
A healthy orchid will be securely packed into its pot. You can hold the orchid up by the leaves and the pot will not fall off.
This step is extremely important. Since most orchids are epiphytes, their roots firmly attach to the tree bark. They need this sense of security, and it can be achieved by inducing a rootbound situation.
If the orchid is so lightly potted into the medium that the pot slides off when you hold it by the leaves, then your orchid will work on attaching itself to the pot rather than producing new roots or new leaves. You can forget about the flower spike until the orchid has found the firmness of the plastic pot and can securely fixate itself to it.
We like to focus on air circulation in the pot and proper water flow, sometimes overdoing these two in detriment to other items. The first time we repot, we tend to make the potting medium too light and airy. Don’t get me wrong, these things are important. But also, being tightly held in place is just as important.
10) Healthy Orchids Have Bigger Leaves Each Year
An orchid’s life is told in its leaves. Once an orchid leaf is wrinkled, bruised, torn, discolored, or curled, it doesn’t change. The problems that made the leaf do its thing are, in essence, the history of the orchid. The only way to erase that history is to wait until the leaf is old enough it will fall off.
When a new leaf is significantly smaller than the previous leaf, this orchid is under stress. It is indicating that last year’s growth was a lot better and the environment was more suited for its growth that this year has been.
There wasn’t enough energy to produce a good, healthy leaf because something else was diverting the orchid’s attention. Pests? Insects? Root Rot? New Potting Medium? Whatever caused the leaf to not grow to its full potential needs to be investigated and fixed. Without decent leaves that are a bit larger each year, orchids don’t grow well.
11) Healthy Orchids Have Thick, Full Pseudobulbs
Phalaenopsis, being monopodial, don’t have pseudobulbs but sympodial orchids do. Cattleyas, Oncidiums, and Cymbidiums have pseudobulbs—the storage house of the orchid.
In most cases, a healthy pseudobulb should be the same color as the leaves, and be firm, not wobbly. Some pseudobulbs are smooth, like the Miltonias, but others have lots of fine wrinkles, like Sherry Babies, but never deep grooves.
Deep grooves and wrinkles mean the orchid is having a hard time either storing or receiving water and may indicate that root health is bad. When you have an orchid with a previously smooth pseudobulb and it suddenly gets wrinkled and shrivels, your orchid is not healthy.
A healthy orchid will have more than three pseudobulbs in the same pot, and just like the previous tip, the pseudobulbs should increase in size each year, not decrease.
12) Healthy Orchids Will Have Thick Aerial Roots
Aerial roots are a clear indication that your orchid is healthy. Not all orchids have aerial roots, but Phalaenopsis do. These aerial roots are real lifesavers and can multiply the quantity of nutrients and water that an orchid receives, so don’t ever cut them off or try to hide them by burying them into the potting medium.
Since I have already touched base a little bit on the topic about humidity, I won’t repeat myself here. But if your orchid has no aerial roots, then you might start investigating the reason behind that.
13) Healthy Orchids Are Pest-Free
The last indication that your orchid is healthy is that there are no visible signs of pests and insects. Fungus gnats are especially “good” for indication, because they only fly around potting medium that is decaying and as their name implies, have decaying material and fungus in the potting medium. If the orchid has a group of gnats around it, then your orchid is not healthy.
Other pests don’t signal that there is a problem with your orchid but are open doors to bringing future problems. If not treated, they can quickly kill your orchid. For example, scale can kill your orchid if not treated.
Examine your orchid to see if anything is moving inside the potting medium or nestled near the crown and stem of your orchid. One place most pests like to live is the underside of a new leaf, close to the stem.
A healthy orchid won’t show any signs of pests or insects.
Depending on the kind of insect, if not treated, it not only could kill this orchid but can infect other orchids in your collection.
How do you know if the orchid is unhealthy and dying?
How do you know if the orchid is unhealthy and dying? Let’s say you have seen that a number of the items listed on the 13 indications above are in the red. Things aren’t so dandy for your orchid.
In this case, the best scenario is to access what you can change and don’t give up. There are only two cases that are strong indications that your orchid is dying—really dying. These are if your orchid has either no roots or no leaves.
If your orchid has no roots, it’s going to be tough to get it back to life but I’ll tell you upfront, it’s not an easy task. Roots are relatively fast to grow and if you can encourage new root growth before the nutrients are all used up, then you can save your orchid. The key here is rapid new root growth.
If you are trying to revive an orchid with no leaves, this is also a daunting project with not very positive results. In this article, about the Sphag-and-bag method, I explain the steps of promoting leaf growth (it works on roots, too). Success is varied. Sometimes the orchid kicks back into circulation, and others, the orchid is so far beyond remedy, that there is not much to be done.
Just don’t give up. Yet…when all roots and leaves are gone, then it’s time to take a stroll to your local nursery or purchase a few orchids online.
Supermarket orchids always seem like a rescue mission to me and sometimes, especially after killing an orchid, I just want an easy orchid to tend to.
What am I doing wrong with my orchid?
Each of these 13 indications above has pointed to a specific problem. Take a closer look at your orchid to see where the mistakes could have been made and research that specific topic. The more information you know about the specific genus and species of your orchid, the better you’ll be able to care for a healthy orchid indoors.
Evaluate the 13 tips, one by one, and honestly ask yourself if your orchid should look different. Once you see what the normal standard is, then you can work to fix what might be hindering the problem.
There are several great websites out there that provide great information. I also have a whole section of “problems” on the learn page, where you can look at specific articles to find out where the underlying problem is.
Now that my orchid is healthy, how do I keep it healthy?
Once you have seen these 13 tips on how to know if your orchid is healthy, then you must keep it that way. Just because it is healthy today, doesn’t mean tomorrow it still will be. Orchids require tender loving care and contrary to that horrible slogan that says they thrive under neglect, they don’t. Please remove yourself from this kind of toxicity in your life. 😊
Orchids need care and love just as much as any houseplant, just don’t show your love with water. If you analyze your growing conditions in terms of light, water, humidity, fertilizer, air circulation, and potting media, you are well on your way to providing excellent orchid care and keeping your orchid healthy. Reading care guides is the first step.
A note on that: I have found that general guidelines are extremely hard to write because everyone has specific conditions that they grow orchids in. Each time I push the “publish” button on “complete care for Cymbidiums”, or “Cattleya Care Guide”, or “Miltoniopsis Care Sheet”, I kind of cringe, knowing that these are general guidelines, not to-die-for rules.
How’s your routine in watering, what type of water, how much sun, what window they are in, is the air conditioner on all day long, what fertilizer do you use… Everything will give different results and interfere with your orchid’s health.
When I give general guidelines, it’s a starting point for your own orchid journey to providing the best orchid care you can to get thriving, healthy orchids. But it’s really up to each person to adapt the guidelines to fit their growing conditions.
Graduating From Orchid Newbie to Orchid Enthusiast
Knowing these 13 tell-all signs about healthy orchids doesn’t mean that you’ve completed this part of the test. The real exam is the practice, not the theory. After you’ve checked the 13 sings that you are providing the proper care and have a healthy orchid on your hands, the ultimate test is to keep your orchid healthy continuously, providing proper care.
You can consider yourself graduated from orchid newbie to orchid enthusiast when you achieve one of these two things:
(1) your orchid has properly blossomed under your care—no cheating here, buying an orchid in bud doesn’t count. It has to be a cultivating an orchid from no spike to the end of the blossoming season.
(2) Producing a new pseudobulb with a leaf and flower spike, or a new keiki. This one is tricky, but I will assume that the keiki is because the orchid is extremely healthy and you’ve provided great care for it, not because it’s a last attempt to procreate its species…
In any event, when you have completed one of these two steps successfully, then congratulations, you have provided proper orchid care.
Don’t Stop Learning!
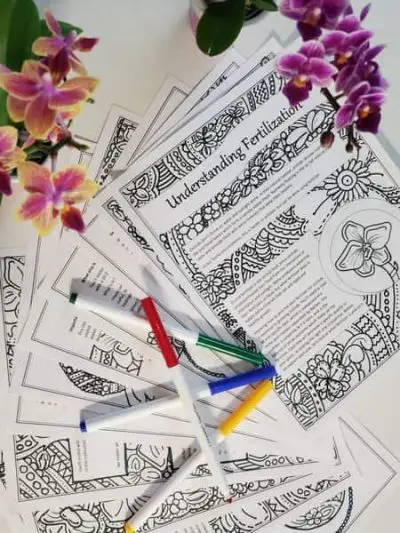
If you want to be included in more information and get a 14-page fertilization guide, please sign up for my newsletter. I don’t spam, but send emails out bi-monthly with some curious topics of interest. If you want more information, click here to go to a specific page on this website where I explain it more in detail.
Also, if you are looking for an orchid journal to keep your notes specifically about orchid care, check out my 2 solutions for that on this page. If note-keeping isn’t your thing, then there is a free excel spreadsheet that you can download. Click here for more information on how to do that.
If you subscribe to my newsletter, I will send you a 14-page guide on the main tips of orchid fertilizer. It is downloadable and you can print it out on your computer. I designed the guide to double up as a coloring book, just to make it fun.
Further Reading Suggestions:
Don’t just take my word for what is written here. Continue researching other articles about orchid health, because everyone has a different point of view and unique techniques that work for them. Here is another article if you’d like to continue your research on signs that your orchid is healthy:
-“Ten Signs that Your Orchids Are Happy ” is written by Sue Bottom and published on American Orchid Association. This is a PDF file that explains more signs to verify how you can measure the success of your orchid care and identify problems before they occur. Happy Cultivating!

I love watching your videos! How often should I fertilize my orchid Phalaenopsis. That is what I am not sure of. I have several different types of orchids from baby to medium size.
Any information would be helpful.
Amanda, I just want to let you know that I really enjoy reading your emails. I have around 50 orchids, don’t ask me why.. I just can’t say no! lol
I don’t have real friends so I really look forward to your emails. It is such a pleasure to read your thoughts because I usually can relate. We have been through some of the same ups and downs in life. I see your growth and that makes me hope people can see my growth to even though no one in my world would ever admit it. I just want to tell you that I’m proud of you. Life can be crazy and you have gotten to a healthy place and it shows. I see it in your smile (in your videos) and I hear it in your words. Keep it going! Please! Sending love your way! ❤️
Rhonda,
WoW! Thank you! Your comment made my day!!